With Camera Plugin, Cordova APPs can take a picture by JavaScript. As known, Cordova create APPs by using HTML, CSS, and JavaScript, but without plugins Cordova can not communicate with device modules or native components in mobile phones. The article gives a brief example to help you understand all the stuff.
All codes here are not complicated, so you can easily understand even though you are still students in school. To benefit your learning, we will provide you download link to a zip file thus you can get all source codes for future usage.
Estimated reading time: 5 minutes
EXPLORE THIS ARTICLE
TABLE OF CONTENTS
BONUS
Source Code Download
We have released it under the MIT license, so feel free to use it in your own project or your school homework.
Download Guideline
- Prepare HTTP server such as XAMPP or WAMP in your windows environment.
- Download and unzip into a folder that http server can access.
SECTION 1
Cordova Camera Plugin
To access devices or components in mobile phones, Cordova needs Plugins as the interface. In this section, you will learn what Cordova Plugin is, what Core Plugin is, and the way to search for desired plugins.
What is Cordova Plugin?
Basically, Cordova Plugins are bridges between Cordova APPs and hardware device or other native components in mobile phones. This is an official definition.
Plugins are an integral part of the Cordova ecosystem. They provide an interface for Cordova and native components to communicate with each other and bindings to standard device APIs. This enables you to invoke native code from JavaScript.
There is a set of plugins called the Core Plugins. These core plugins make your application to access to device capabilities such as battery, camera, network, etc. In addition, there are Third-Party Plugins for various functionality. Search plugins you want in Cordova Plugin Search page.
Install Camera Plugin
When you create a Cordova project, in Cordova project folder such as c:\camera in this article, issue Cordova CLI command lines to add Android platform, and then install Camera Plugin as the following,
c:\>cordova create camera com.easycodeshare.camera Camera
c:\>cd camera
c:\camera>cordova platform add android
c:\camera>cordova plugin add corodva-plugin-camera
Where camera indicates PATH, com.easycodeshare.camera represents Android ID, and Camera is human-readable NAME. Refer to procedure of building Cordova APPs for more details.
SECTION 2
Cordova APPs Take Picture
The section interprets how the example JavaScript files open camera component, and get a taken picture in Cordova projects. At last, we raise a building practice to generate an APP.
Cordova Plugin Access Camera
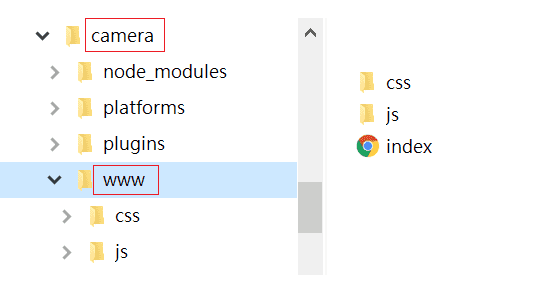
Download source codes and put them into camera/www folder as below.
When Android starts up and triggers onDeviceReady(), a button is ready to click. Once clicked, navigator.camera.getPicture() is called. The calling carries parameters like callback functions for success and failure, and camera options.
function onDeviceReady() {
    console.log('Running cordova-' + cordova.platformId + '@' + cordova.version);
    $('#shot').on("click", function() {
        navigator.camera.getPicture(onSuccess, onFail, {
            quality: 50,
            correctOrientation: true,
            destinationType: Camera.DestinationType.DATA_URL,
        });
    });
}
Javascript Take Picture
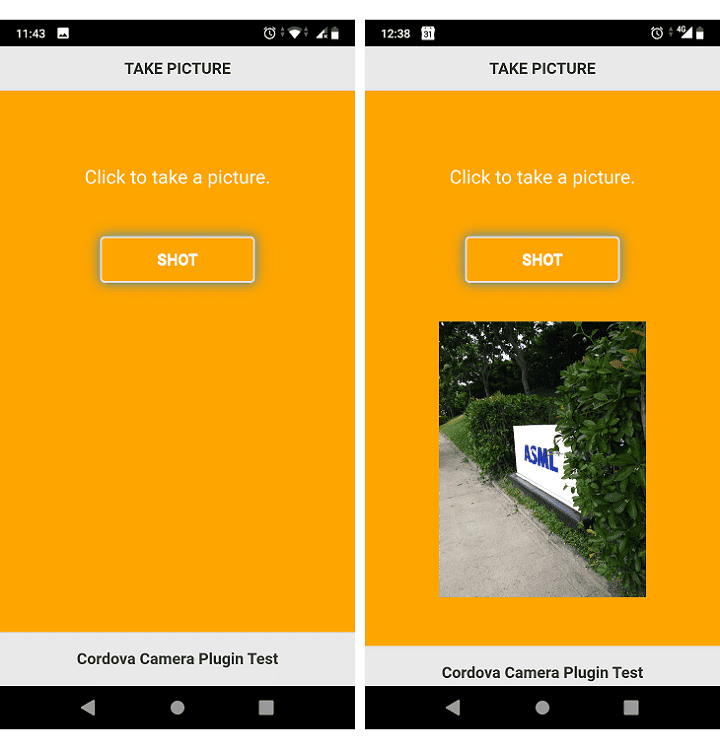
Left screen is in ready state for users to click a button. When clicking and opening camera, you keep focusing on objects and take a picture. At the moment, camera panel asks you for save or abort. If saved, right screen displays the photo you take.
The callback onSuccess() puts the string-based image with a header into a HTML element <img id="myimg">.
function onSuccess(img) {
var image = document.getElementById('myimg');
image.src = "data:image/jpeg;base64," + img;
}
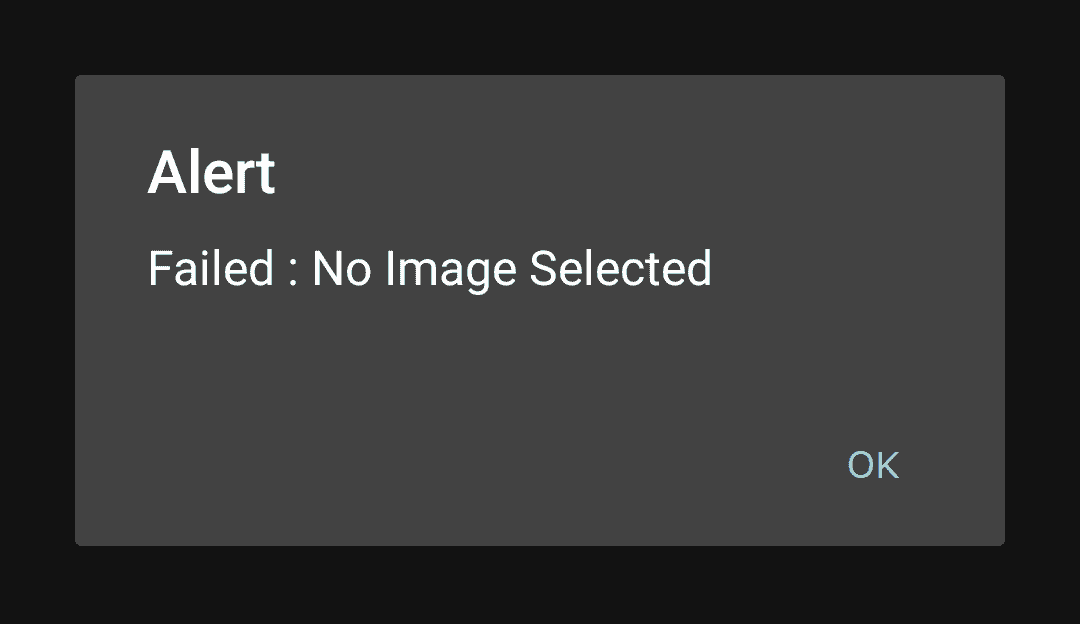
function onFail(error) {
alert('Failed : ' + error);
}
If abort, callback function onFail() alerts a message like this.
Let’s go back to HTML to see how easily jQuery Mobile makes HTML layout fit mobile phones. Remind that you should download jQuery and jQuery Mobile files, and not use jQuery CDN.
<link rel="stylesheet" href="css/1.4.5/jquery.mobile.min.css">
<script src="js/jquery-1.11.1.min.js"></script>
<script src="js/1.4.5/jquery.mobile.min.js"></script>
<!-- ignored -->
<div data-role="page" style="background:orange;">
    <div data-role="header">
        <h1>TAKE PICTURE</h1>
    </div>
    <div data-role="content">
        <div class="user-data">
        <p>Click to take a picture.</p>
        <button class="ui-btn ui-corner-all" id="shot">SHOT</button>
        <img id="myimg"></img>
        </div>
    </div>
    <div data-role="footer" data-position="fixed">
        <p style="text-align:center;">Cordova Camera Plugin Test</p>
    </div>
</div>
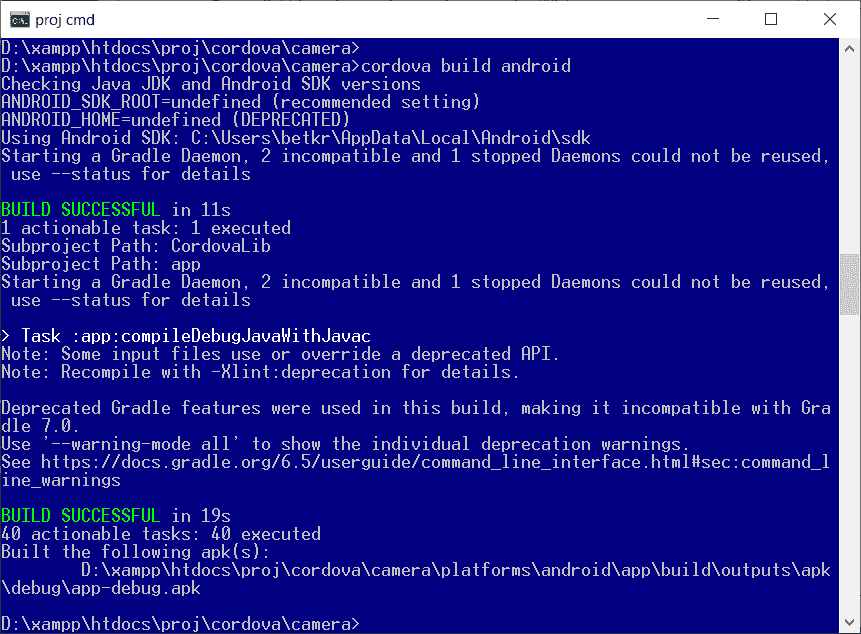
Build Cordova APPs
Finally, Cordova allows you to build and indicates the long path for resulting APK file like the following.
FINAL
Conclusion
Cordova projects for taking a picture have platform-dependent settings for iOS especially. According to official documents, adding some settings in config.xml will make the APP real hybrid.
Thank you for reading, and we have suggested more helpful articles here. If you want to share anything, please feel free to comment below. Good luck and happy coding!
Suggested Reading
TRY IT
Quick Experience
That is all for this project, and here is the link that let you experience the program. Please kindly leave your comments for our enhancement.
Try It Yourself
Click here to execute the source code, thus before studying the downloaded codes, you can check whether it is worthy.