
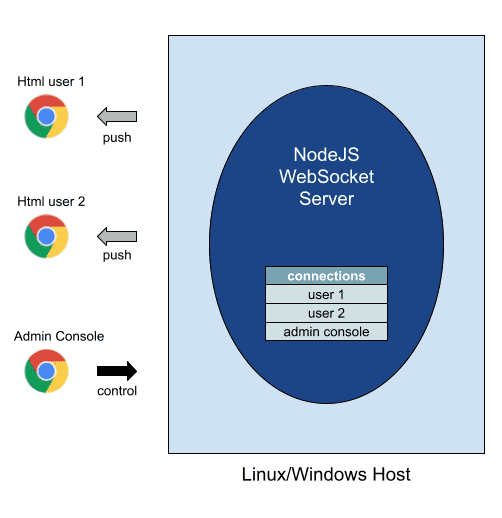
Unlike HTTP servers, WebSocket servers can push a message to a specific client in Html and JavaScript. The feature is valuable for many applications such as web chatting.
This article starts from WebSocket basics that introduces the way how clients and servers talk. Subsequently, the demo example uses NodeJS to build a server that manages multiple TCP connections and indexes them. By the way, the WebSocket server knows each clients for messages to send.
The clients are in Html and JavaScript running on modern browsers that have build-in WebSocket support. Moreover, we design a special role called Admin Console so that WebSocket servers can push any message to a specific client.
All codes here are not complicated, so you can easily understand even though you are still students in school. To benefit your learning, we will provide you download link to a zip file thus you can get all source codes for future usage.
Estimated reading time: 12 minutes
EXPLORE THIS ARTICLE
TABLE OF CONTENTS
BONUS
Source Code Download
We have released it under the MIT license, so feel free to use it in your own project or your school homework.
Download Guideline
- Prepare HTTP server such as XAMPP or WAMP in your windows environment.
- Download and unzip into a folder that http server can access.
SECTION 1
WebSocket Basics
What is the difference between WebSocket and HTTP? Some stuff in this section is more theoretical and can be ignored if not interested in. Just let you know where the WebSocket protocol comes from.
WebSocket vs HTTP
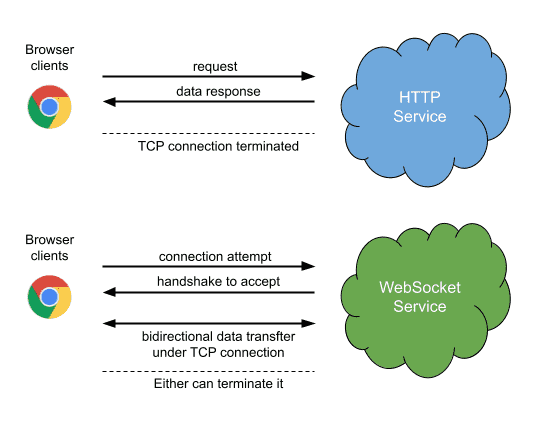
For HTTP with http:// or https://, one request is associated with one response. After the client receives one response, the TCP connection gets terminated, so multiple responses are not allowed. In brief, each request always establishes a separate TCP connection, even though the request comes from the same client.
However, WebSocket with ws:// or wss:// is different. Once a client and a server establish a connection, their communication takes place bidirectionally until one of them dies or actively closes the TCP connection.
Unix socket Functions
Earlier, Unix socket functions implement TCP connection in various applications. Let’s take a look inside. Along with HTTP Handshake, the TCP socket connection becomes the popular WebSocket protocol. In a word, you can say WebSocket is composed of socket connection and a special HTTP handshake.
WebSocket = TCP(socket) connection + HTTP handshake
By inspecting the diagram below, you can tell the difference between HTTP service and WebSocket service. The former terminates connection after each service, but the latter allow the client and server exchange data several times until either site determines to disconnect.
Client/Server Roles
Under Unix socket structure, the server site listens each incoming connection attempt by a series of actions.
- socket(): create a socket file descriptor, sockfd.
- bind(): bind sockfd with an address and an port.
- listen(): listen connection attempts with clients’ handshake request.
- accept(): complete handshake and decide acceptance.
How does the client site ask for connection attempts? The procedure is simpler than servers do.
- socket(): create a socket file descriptor, sockfd.
- connect(): make a connection request with handshake.
Once connection attempt is accepted, both client and server sites send and receive data by read() and write() until the connection is terminated. The diagram shows the basic procedure.

SECTION 2
NodeJS WebSocket Server
Approaches to implement WebSocket servers could be PHP, Python, and NodeJS. However, we choose the last one because of its simplification. The feature reduces efforts for indexing several TCP connections which is essential in the section.
Launch NodeJS WebSocket Server
Assume that you have installed NodeJS, follow the steps below. Download and extract our example files to a directory such as c:\sample, change to the directory, install WebSocket package by command line, npm install websocket, and check whether an additional file and a folder are added or not. Finally, execute server.js under NodeJS. In Linux, the procedure is similar.
c:\> cd sample

c:\sample> dir

2021/12/02  05:15 pm             1,962 admin.html

2021/11/30  04:08 pm             1,394 LICENSE.txt

2021/12/10  03:55 pm             3,704 server.js

2021/12/02  05:15 pm               461 style.css

2021/12/02  05:15 pm             1,366 user.html

c:\sample> npm install websocket

c:\sample> dir

2021/12/02  05:15 pm             1,962 admin.html

2021/11/30  04:08 pm             1,394 LICENSE.txt

2021/12/10  03:55 pm    <DIR>          node_modules

2021/12/10  03:55 pm             4,933 package-lock.json

2021/12/10  03:55 pm             3,704 server.js

2021/12/02  05:15 pm               461 style.css

2021/12/02  05:15 pm             1,366 user.html

c:\sample> node server.js

Mon Dec 06 2021 19:08:16 GMT+0800 (GMT+08:00) Server is listening on port 8080

Mon Dec 06 2021 19:08:22 GMT+0800 (GMT+08:00) Connection accepted. User key: WPe1I4D4U6JMtgVLnU+KmA==

Received Message: {"req":"text","text":"user message 1"}
As shown above, the server is listening now. When a connection attempt is accepted, the server indexes it. If clients actively send messages, the server just replies with what they sends.
Indexing TCP Connections
The major topic here is how to make the server hold many connections simultaneously, index them, and be able to push a message to any specific client.
// add an entry
lookup[request.key] = conn;
role[request.key] = 'user';
The mechanism for holding many TCP connections uses the data structure as above. The data structure lookup contains connection objects which are indexed by users’ request keys, such as WPe1I4D4U6JMtgVLnU+KmA==.
Each connection object conn plays a role, user or admin. The reason why to design a admin role will be explained later.
var WebSocketServer = require('websocket').server;
var http = require('http');
var port = 8080
var lookup = {}, role = {};
var server = http.createServer(function(request, response) {
    console.log((new Date()) + ' Received request for ' + request.url);
    response.writeHead(404);
    response.end();
});
server.listen(port, function() {
    console.log((new Date()) + ' Server is listening on port ' + port);
});
wsServer = new WebSocketServer({
    httpServer: server,
    // You should not use autoAcceptConnections for production
    // applications, as it defeats all standard cross-origin protection
    // facilities built into the protocol and the browser.  You should
    // *always* verify the connection's origin and decide whether or not
    // to accept it.
    autoAcceptConnections: false
});
function originIsAllowed(origin) {
  // put logic here to detect whether the specified origin is allowed.
  return true;
}
wsServer.on('connect', function (webSocket) {
    //nothing
});
wsServer.on('request', function(request) {
    if (!originIsAllowed(request.origin)) {
      // Make sure we only accept requests from an allowed origin
      request.reject();
      console.log((new Date()) + ' Connection from origin ' + request.origin + ' rejected.');
      return;
    }
    var conn = request.accept('echo-protocol', request.origin);
    console.log((new Date()) + ' Connection accepted. User key: ' + request.key);

    // add an entry
    lookup[request.key] = conn;
    role[request.key] = 'user';

    display_connections('Current active connections');

    conn.on('message', function(message) {
        if (message.type === 'utf8') {
            console.log('Received Message: ' + message.utf8Data);
            msg = JSON.parse(message.utf8Data);
            console.log(msg);
            if(msg.req == "get connections") {
                role[request.key] = 'admin';
                resp = {"resp": "get connections", "content": role }
                conn.sendUTF(JSON.stringify(resp));
            }
            else if(msg.req == "push a user") {
                user_conn = lookup[msg.userkey];
                if(user_conn != undefined) {
                    resp = {"resp": "text", "content": msg.text}
                    user_conn.sendUTF(JSON.stringify(resp));
                    resp = {"resp": "text", "content": "Already sent."}
                    conn.sendUTF(JSON.stringify(resp));
                }
                else { // refresh user list in admin console
                    resp = {"resp": "text", "content": "Refresh user list complete. Try again!"}
                    conn.sendUTF(JSON.stringify(resp));
                    resp = {"resp": "get connections", "content": role}
                    conn.sendUTF(JSON.stringify(resp));
                }
            } else {
                resp = {"resp": msg.req, "content": msg.text}
                conn.sendUTF(JSON.stringify(resp));
            }
            display_connections("Request: " + msg.req);
        }
    });
    conn.on('close', function(reasonCode, description) {
        console.log((new Date()) + ' Peer ' + conn.remoteAddress + ' disconnected.');
        // remove an entry
        for (key in lookup) {
            if (key == request.key) { delete lookup[key], delete role[key]; }
        }
        display_connections('Current active connections (close event)');
    });
});
function display_connections(prompt_msg) {
    console.log(prompt_msg);
    console.log(role);
}
You may not find any HTTP handshake in the above. Actually, the NodeJS WebSocket package completes HTTP handshake internally, so there are no codes about handshaking in server.js. We concentrate on indexing accepted connections, and deal with incoming messages or commands that are in JSON format.
Admin Console Issue Commands to WebSocket Server
The event handler conn.on('message', ... will get 3 types of requests or commands. Beside the common messages, there are two commands, “get connections” and “push a user”.
We design a role of Admin Console(Client) to help the server to choose a specific client for sending any message. Truly, you could call it an Admin Client, but it does tasks that user clients can not do.
| Request | Remark |
|---|---|
| get connections | By the command, Admin Console would like to inquire current connections, The table role has entries such as { ‘WPe1I4D4U6JMtgVLnU+KmA==’: ‘user’, ’95Bq/gTa7rowHRfqc1M9HA==’: ‘user’, ‘BEt0hhb+LWrRgk2+mad9Lg==’: ‘admin’ } Admin Console ignores itself, the role of admin, and saves the others. |
| push a user | By the command, Admin Console asks the server to send a message to a selected client, such as { req: ‘push a user’, userkey: ’95Bq/gTa7rowHRfqc1M9HA==’, text: ‘push message to user 2’ } Each connection or client is indexed by its initial handshake key. |
| echo function | User clients send messages to the server, and always get the same data back. |
Below are logs in server sites. You will find that users and administrator are recorded one by one. At first, assign each client as user. Then, the server will change client’s role from user to administrator when receiving a “get connections” command.
Mon Dec 06 2021 19:08:16 GMT+0800 (GMT+08:00) Server is listening on port 8080

Mon Dec 06 2021 19:08:22 GMT+0800 (GMT+08:00) Connection accepted. User key: WPe1I4D4U6JMtgVLnU+KmA==

Current active connections

{ 'WPe1I4D4U6JMtgVLnU+KmA==': 'user' }

Mon Dec 06 2021 19:08:23 GMT+0800 (GMT+08:00) Connection accepted. User key: 95Bq/gTa7rowHRfqc1M9HA==

Current active connections

{

  'WPe1I4D4U6JMtgVLnU+KmA==': 'user',

  '95Bq/gTa7rowHRfqc1M9HA==': 'user'

}

Mon Dec 06 2021 19:08:26 GMT+0800 (GMT+08:00) Connection accepted. User key: BEt0hhb+LWrRgk2+mad9Lg==

Current active connections

{

  'WPe1I4D4U6JMtgVLnU+KmA==': 'user',

  '95Bq/gTa7rowHRfqc1M9HA==': 'user',

  'BEt0hhb+LWrRgk2+mad9Lg==': 'user'

}

Received Message: {"req":"get connections"}

{ req: 'get connections' }

Request: get connections

{

  'WPe1I4D4U6JMtgVLnU+KmA==': 'user',

  '95Bq/gTa7rowHRfqc1M9HA==': 'user',

  'BEt0hhb+LWrRgk2+mad9Lg==': 'admin'

}

Received Message: {"req":"push a user","userkey":"WPe1I4D4U6JMtgVLnU+KmA==","text":"push message to user 1"}

Received Message: {"req":"push a user","userkey":"95Bq/gTa7rowHRfqc1M9HA==","text":"push message to user 2"}

Received Message: {"req":"push a user","userkey":"WPe1I4D4U6JMtgVLnU+KmA==","text":"Goodbye user 1"}

Received Message: {"req":"push a user","userkey":"95Bq/gTa7rowHRfqc1M9HA==","text":"Goodbye user 2"}

Received Message: {"req":"text","text":"message from user 1"}

{ req: 'text', text: 'message from user 1' }

Received Message: {"req":"text","text":"message from user 2"}

{ req: 'text', text: 'message from user 2' }
Subsequently, as above, the Admin Console push different messages to different users by asking the WebSocket server. Finally, any user client can send text data to the server and get the same content back. Those are all the scenario for introduction.
SECTION 3
HTML JavaScript Client
Under browsers compatible with WebSocket, Html clients can talk to WebSocket servers. In the section, we classify Html clients into two roles, user and admin, and demonstrate how they interact with server sites, respectively.
WebSocket User Client
Most modern browsers support WebSocket, thus the HTML client user.html can use built-in objects to create a TCP socket with IP address and port of a remote WebSocket server.
Once created, you have to assign callback functions to important events, CONNECTED, CLOSE, ERROR, and ON MESSAGE. When events trigger, callback functions will write console logs that can be found in browser F12 Inspect. Clicking buttons in HTML will send messages by using WebSocket method socket.send().
 <!DOCTYPE html>
<html>
<head>
<title>Websocket - User</title>
<meta charset="utf-8">
<meta name="viewport" content="width=device-width, initial-scale=1, shrink-to-fit=no">
<link rel="stylesheet" type="text/css" href="style.css"/>
<script src="https://ajax.googleapis.com/ajax/libs/jquery/3.4.0/jquery.min.js"></script>
</head>
<body style="background: blue;">
<div class="ws-content">
<p>Text to send:</p>
<input type="text" id="stext" value="user message"></input>
<button id="btn">Send to server</button>
<p>Text received:</p>
<div id="rtext"></div>
</div>
</body>
</html>
<script>
var host = 'ws://localhost:8080';
var socket = new WebSocket(host, 'echo-protocol');
socket.onopen = function(evt) { console.log(evt); };
socket.onclose = function(evt) { console.log(evt); };
socket.onerror = function(evt) { console.log(evt); };
socket.onmessage = function(evt) {
    obj = JSON.parse(evt.data);
    console.log(obj);
    if (obj.resp == "text") {
        $("#rtext").append(obj.content + "<br>").scrollTop($('#rtext')[0].scrollHeight);
    }
};
$("#btn").on("click", function () {
   sendObject({"req": "text", "text": $("#stext").val()})
});
function sendObject(obj) {
    if (socket.readyState != 1) return; // OPEN: 1
    socket.send(JSON.stringify(obj));
    console.log(obj);
}
</script>
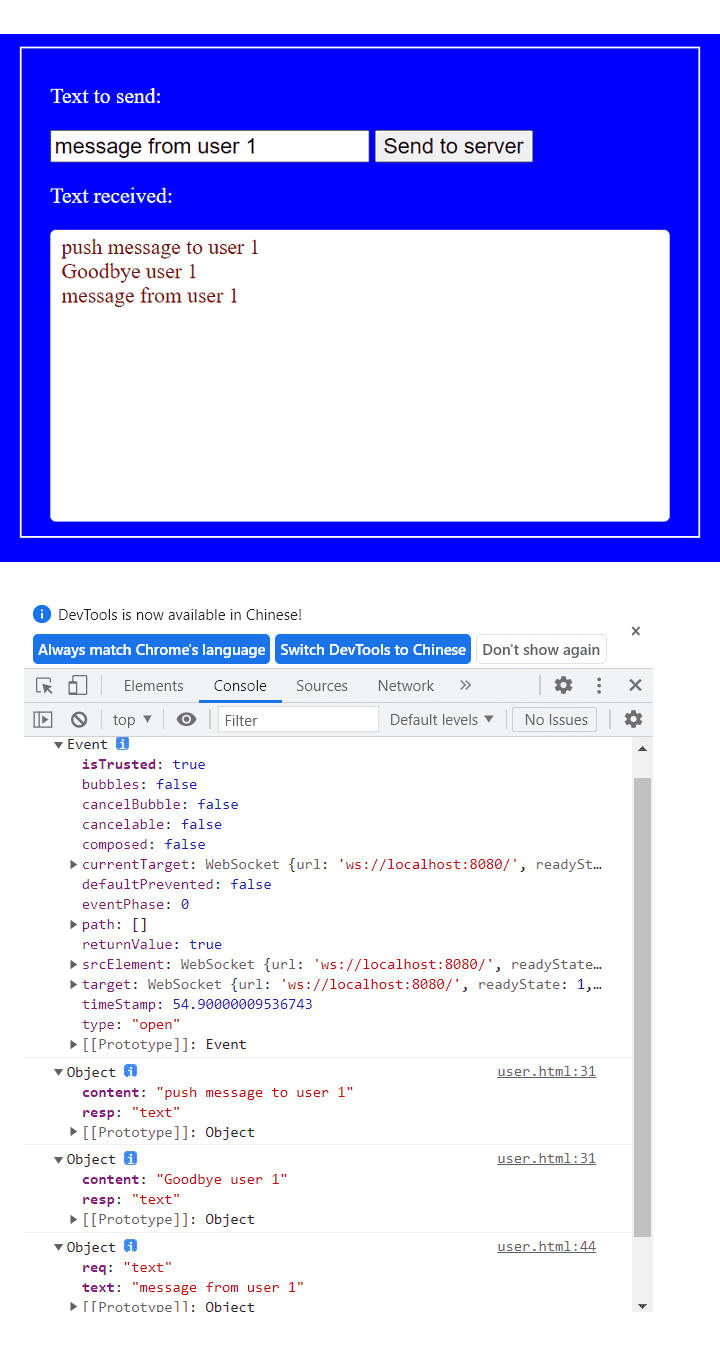
The screen layout and data exchange scenario are shown below. In console logs, the initial event displays all properties of this connection. Next, there are two messages pushed from server sites. They are “push message to user 1” and “Goodbye user 1”. Finally, users click HTML button and send “message from user 1” to server sites.
WebSocket Admin Console
Server sites are running daemon processes, hence, to control it is to create an Admin Console. Thus administrators are able to order commands to push messages to a sepcific Html client. In admin.html, when a connection attempt is accepted, Admin Console sends a “get connections” command for knowing how many users have already linked to the server, and also announcing that he plays an administrator role.
When Admin Console initially makes a request of “get connections”, the WebSocket server gives him a list of all connected users so that Admin Console can choose any specific client for sending a message. By clicking a button, Admin Console would issue a “push a user” command with the selected client and the message in text box.
<!DOCTYPE html>
<html>
<head>
<title>Websocket - Admin</title>
<meta charset="utf-8">
<meta name="viewport" content="width=device-width, initial-scale=1, shrink-to-fit=no">
<link rel="stylesheet" type="text/css" href="style.css"/>
<script src="https://ajax.googleapis.com/ajax/libs/jquery/3.4.0/jquery.min.js"></script>
</head>
<body style="background: navy;">
<div class="ws-content">
<p>Text to user:</p>
<input type="text" id="stext" value="push message to user"></input>
<button id="btn">Push to a user</button>
<p>User list:</p>
<select id="user-list" class="align-left"></select><br><br>
<div id="rtext"></div>
</div>
</body>
</html>
<script>
var host = 'ws://localhost:8080';
var socket = new WebSocket(host, 'echo-protocol');
socket.onopen = function(evt) { sendObject({"req": "get connections" }); };
socket.onclose = function(evt) { console.log(evt); };
socket.onerror = function(evt) { console.log(evt); };
socket.onmessage = function(evt) {
    obj = JSON.parse(evt.data);
    console.log(obj);
    if (obj.resp == "get connections") {
        content = obj.content;
        // Refresh user list
        user_list = "";
        i = 1;
        for(id in content) {
            if (content[id] == 'user') {
                user_list += "<option value='" + id + "'>USER : user" + i.toString() + "</option>";
                i++;
            }
        }
        $("#user-list").html(user_list);
    }
    else if (obj.resp == "text") {
        $("#rtext").append(obj.content + "<br>").scrollTop($('#rtext')[0].scrollHeight);
    }
};
$("#btn").on("click", function () {
    obj = {"req": "push a user", "userkey": $('#user-list').find(":selected").val(), "text": $("#stext").val()}
    sendObject(obj);
});
function sendObject(obj) {
    if (socket.readyState != 1) return; // OPEN: 1
    socket.send(JSON.stringify(obj));
    console.log(obj);
}
</script>
The console logs illustrate that Admin Console gets a list of 3 connected clients, 2 users and 1 admin, just at the moment he has connected to a WebSocket server successfully. However, he wants only the 2 user clients.
The Admin Console pushes a message by using the command “push a user”, and gets back a response, “Already sent”, from the WebSocket server. Indeed, the WebSocket server is controlled by Admin Console to push a message to a specific client.

FINAL
Conclusion
Why is HTTP service unable to push a message to a specific client? There is no address for clients so as not to locate them. For WebSocket servers, indexed TCP connections are addresses that anchors each client for messages to push.
Thank you for reading, and we have suggested more helpful articles here. If you want to share anything, please feel free to comment below. Good luck and happy coding!
Suggested Reading
- Trigger Remote Shell Script on Linux via Http Browser
- Tips for Making Endless Page Scroll Against Pagination
- Auto Refresh HTML Data in Web Page by 4 Methods