
We introduce a JavaScript RSA library that can be used with HTML browser, rather than with Node.js. Browser clients can generate keys with specified key size. The server sites receive public keys from clients for encrypting data in the future.
If prefering to generate keys in server sites, you can read the post PHP RSA Encrypt and Generate Keys in Server Site.
All codes here are not complicated, so you can easily understand even though you are still students in school. To benefit your learning, we will provide you download link to a zip file thus you can get all source codes for future usage.
Estimated reading time: 5 minutes
EXPLORE THIS ARTICLE
TABLE OF CONTENTS
BONUS
Source Code Download
We have released it under the MIT license, so feel free to use it in your own project or your school homework.
Download Guideline
- Prepare HTTP server such as XAMPP or WAMP in your windows environment.
- Download and unzip into a folder that http server can access.
SECTION 1
JavaScript RSA Library
Truly, three MIT mathematicians invent the RSA cryptography. The initials of their surnames names the algorithm. Both JavaScript and PHP have RSA libraries to operate public key encryption methods.
The RSA Basics
In 1977, MIT colleagues Ron Rivest, Adi Shamir, and Leonard Adleman discover the RSA algorithm, which is the world’s most widely used public-key cryptography method. The operational steps on RSA to keep messages safe are,
- Key Generation: Site A generates key-pair of a private key and a public key.
- Key Exchange: Site A sends only public key to site B.
- Sending Encrypted Data: Site B send public-key-encrypted data to Site A.
- Decrypting Ciphertext: Site A decrypts received ciphertext into clear text.
RSA Libraries in PHP and JavaScript
Client and server ends could be running on different programming scripts, while different RSA libraries used in both sites should be available to cooperate with each other to exchange keys and then protect messages in a similar way. This example leverages the following libraries to go.
- PHP OpenSSL Extension for server sites.
- EBW-JSEncrypt for client sites.
SECTION 2
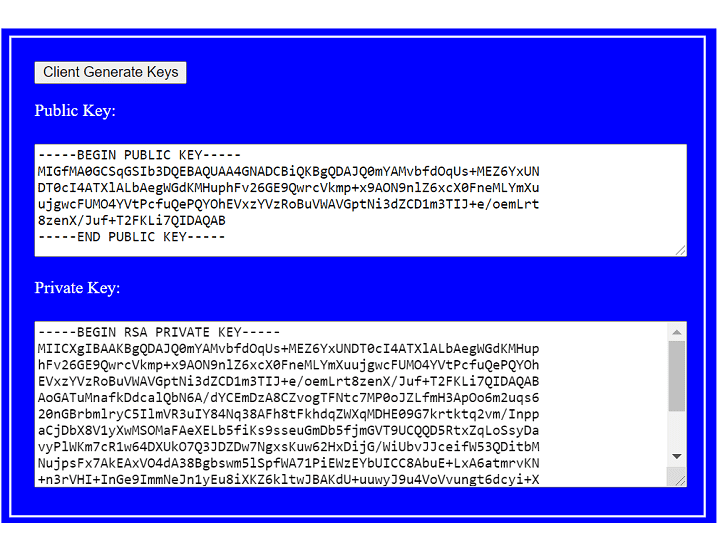
Client Generate Keys
Complete operational steps come from key generation. Going through this section will result in deeper understanding the flow.
Public Key Cryptography
Clicking a button cause browser clients to generate keys store on HTML pages. We set key size to be 1024-byte. Below shows that public key is shorter than private key.
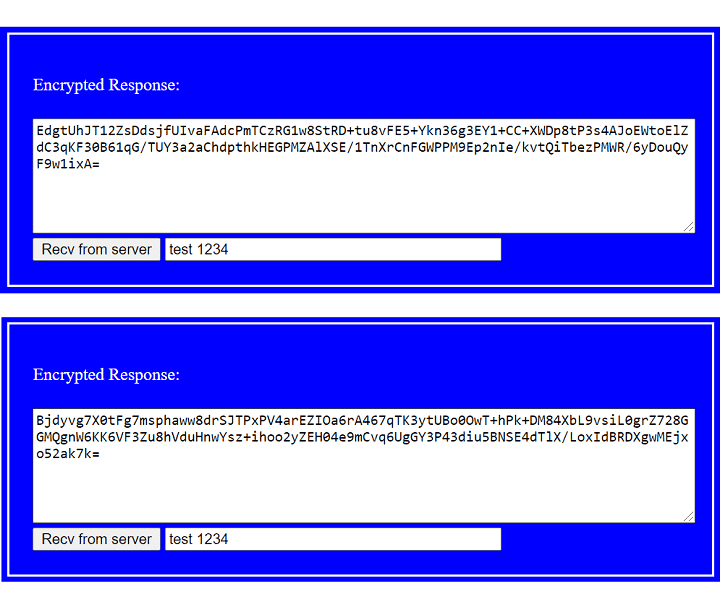
Next, for getting server response to decrypt, click another button. Clear text inside the encrypted response is test 1234.
In fact, the following two ciphertext can result in the same clear text. But why? A secure RSA encryption is implemented with an appropriate padding scheme, which includes some randomness. Without padding, RSA would indeed generate the same ciphertext each time. See OAEP for more details.
Client-Site RSA Library
Subsequently, let’s read codes. You should include EBW-JSEncrypt library jsencrypt.min.js in the beginning. Click a button to generate keys, and send public key to the folder data on server site. The public key file publickey-c.pem is of PEM format that embed key data with header —–BEGIN PUBLIC KEY—– and tailer —–END PUBLIC KEY—–.
Also the folder contains a clear text file. When clicking to get response, the clear text test 1234 encrypted by the public key will go to browser client. Private key decryption will prove if received message is correct.
<script src="js/jsencrypt.min.js"></script>
.....
<div class="step-block">
<button class="btn-rsa" id="genkey">Client Generate Keys</button>
<p>Public Key:</p>
<textarea id="publickey"></textarea>
<p>Private Key:</p>
<textarea id="privatekey"></textarea>
</div>
<div class="step-block">
<p>Encrypted Response:</p>
<textarea id="endata-get"></textarea>
<button class="btn-rsa" id="get">Recv from server</button>
<input type="text" id="cleartext"></input>
</div>
.....
<script>
var keySize = 1024;
var ajax_url = "ajax-server-c.php";
$("#genkey").on("click", function (r) {
    var obj = new JSEncrypt({default_key_size: keySize});
    obj.getKey();
    $("#publickey").val(obj.getPublicKey());
    $("#privatekey").val(obj.getPrivateKey());
    $.post(ajax_url, { action:"pubkey", publickey:$("#publickey").val() }, function (r) {
        alert(r);
    });
});
$("#get").on("click", function (r) {
    $.post(ajax_url, { action:"get" }, function (endata) {
        $("#endata-get").val(endata);
        var obj = new JSEncrypt();
        obj.setPrivateKey($("#privatekey").val());
        var cleartext = obj.decrypt(endata);
        $("#cleartext").val(cleartext);
    });
});
</script>
As the diagram below, a browser client stores generated RSA keys in HTML or browser local storage. Then it publishes a public key to peer ends. The server site stores public key. When clients ask for data, servers encrypt it using public keys in transmission. Of course, clients is capable of decrypting received data using private keys.

Server-Site RSA Library
The server accepts two commands: store key and reply encrypted data. Using PHP OpenSSL Extension, the function openssl_public_encrypt() encrypts a message. Note that the public-key encrypted binary data should be converted into Base64 format.
<?php
$publicfile_c = "data/publickey-c.pem";
$cleartextfile = "data/cleartext";
if($_POST["action"] == "pubkey") {
    $publickey_c = $_POST["publickey"];
    file_put_contents($publicfile_c, $publickey_c);
    echo "Client Public Key Saved In Server Site";
}
if($_POST["action"] == "get") {
    $publickey_c = file_get_contents($publicfile_c);
    $cleartext = file_get_contents($cleartextfile);
    openssl_public_encrypt($cleartext, $endata, $publickey_c);
    echo base64_encode($endata);
}
?>
FINAL
Conclusion
Most Javascript RSA solutions are available for Node.js, while we introduce a rarely noticed project for browser clients. Indeed, its design is brief and easy to use.
Thank you for reading, and we have suggested more helpful articles here. If you want to share anything, please feel free to comment below. Good luck and happy coding!
Suggested Reading
TRY IT
Quick Experience
That is all for this project, and here is the link that let you experience the program. Please kindly leave your comments for our enhancement.
Try It Yourself
Click here to execute the source code, thus before studying the downloaded codes, you can check whether it is worthy.