We provide MQTT client example using JavaScript, which can be executed on browsers. Furthermore, for beginner, there is a free MQTT server to use for testing. Finally, we suggest when to use MQTT on applications.
All codes here are not complicated, so you can easily understand even though you are still students in school. To benefit your learning, we will provide you download link to a zip file thus you can get all source codes for future usage.
Estimated reading time: 7 minutes
EXPLORE THIS ARTICLE
TABLE OF CONTENTS
BONUS
Source Code Download
We have released it under the MIT license, so feel free to use it in your own project or your school homework.
Download Guideline
- Prepare HTTP server such as XAMPP or WAMP in your windows environment.
- Download and unzip into a folder that http server can access.
SECTION 1
How MQTT Works
MQTT is a popular protocol for IoT (Internet of Things). To give you concepts, we brief describe its operational roles and procedure of data transmission.
MQTT Roles
MQTT is a transport protocol for lightweight messages. There are 3 roles in MQTT: publisher, subscriber, and broker. The former two roles exchange data based on Topic, rather than individual address. The latter one is like a middle-ware to pass through messages, and to administrate the mechanism with configuration such as QoS, retained message, etc.
MQTT is an OASIS standard messaging protocol for the Internet of Things (IoT). It is designed as an extremely lightweight publish/subscribe messaging transport that is ideal for connecting remote devices with a small code footprint and minimal network bandwidth. MQTT today is used in a wide variety of industries, such as automotive, manufacturing, telecommunications, oil and gas, etc.
MQTT Connect
For data exchange, either publishers or subscribers have to connect to message broker in advance. For example, there is a famous MQTT broker called Mosquitto.
To connect, you had better include connecting parameters Client ID, though it is optional. Client ID helps a MQTT broker to identify devices, and to clear entries when disconnected.
MQTT Publish and Subscribe
Basically, a publish role sends messages, while a subscribe role receives messages. The way to identify each other is not address, but a specific term called Topic. Only messages around the Topic are exchanged.
A device can play both roles of publisher and subscriber, thus it can send status reports or receive controlling commands. For example, you can set Topic to be the device Id. And then all messages about this device Id will be sent and received.
SECTION 2
Free and Secure MQTT Server
For beginners without any MQTT server, free servers are valuable for studying and testing IoT related stuff.
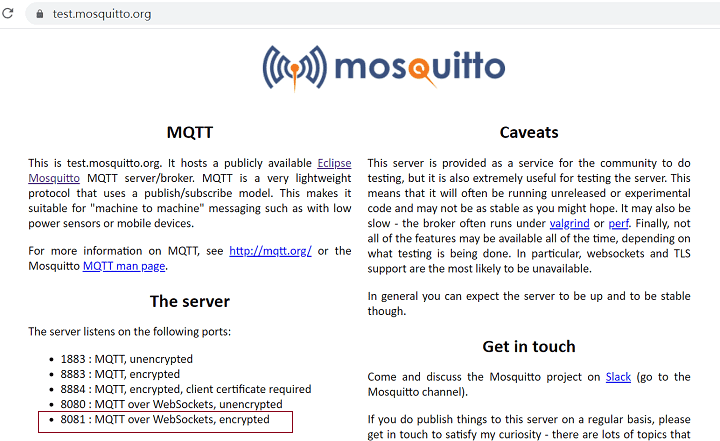
Mosquitto Test Server
The MQTT server to be introduced is provided by Eclipse Mosquitto™ – An open source MQTT broker. It is a free and secure. The public address is test.mosquitto.org, and you can use either the port 8080 or the secure port 8081 for encrypted MQTT over Websockets. The example uses unencrypted port 8080.
How Many Clients Are Connected to It
You can install mosquitto client on Windows in order to check how many messages are exchanging. After installation, issue the command to subscribe all topics on this server.
c:\>mosquitto_sub -h test.mosquitto.org -t "#" -v
Try it, and it will be surprising to see that many data on this MQTT server throughout the world.
SECTION 3
JavaScript MQTT Clients
Using Eclipse Paho MQTT library, the section discusses some operations according to MQTT roles, and upon which applications MQTT data exchange is suggested to use.
Subscriber
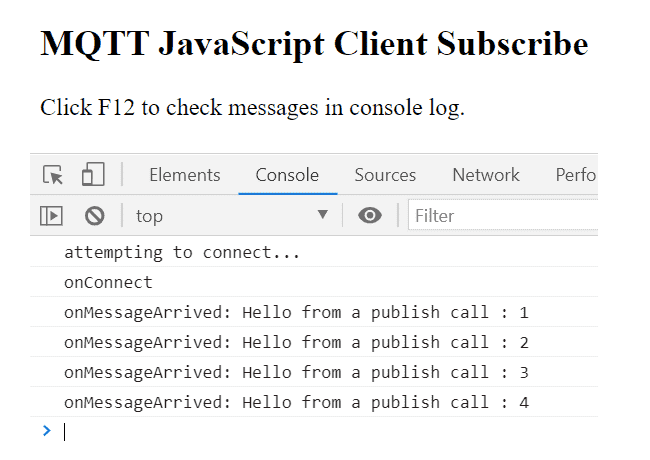
To create a MQTT client using JavaScript, you should include paho-mqtt.js at the first beginning. Then new a instant, connect to Mosquitto test server with a client id sub-client-id. If connected, onConnect() callback function starts to listen all messages around the topic of world.
<!DOCTYPE html>
<html>
<head>
  <title>MQTT JavaScript Client Subscribe</title>
  <script src="paho-mqtt.js"></script>
  <script src="util.js"></script>
</head>
<h2>MQTT JavaScript Client Subscribe</h2>
<p>Click F12 to check messages in console log.<p>
</html>
<script>
// Create a client instance
var client = new Paho.Client(mqtt.hostname, Number(mqtt.port), "sub-client-id");
// set callback handlers
client.onConnectionLost = onConnectionLost;
client.onMessageArrived = onMessageArrived;
// connect the client
console.log("attempting to connect...")
client.connect({onSuccess:onConnect, useSSL: false});
// called when the client connects
function onConnect() {
  // Once a connection has been made, make a subscription and send a message.
  console.log("onConnect");
  client.subscribe(topic_name);
}
</script>
var mqtt = { hostname: "test.mosquitto.org", port: 8080 };
var topic_name = "world";
var publish_cnt = 0;
// called when the client loses its connection
function onConnectionLost(responseObject) {
  if (responseObject.errorCode !== 0) {
    console.log("onConnectionLost: "+responseObject.errorMessage);
  }
}
// called when a message arrives
function onMessageArrived(message) {
  console.log("onMessageArrived: "+message.payloadString);
}
Publisher
Like the previous role, publishers include paho-mqtt.js, but connect to Mosquitto test server with another client id pub-client-id. If connected, callback function send messages with the same topic world periodically.
<!DOCTYPE html>
<html>
<head>
  <title>MQTT JavaScript Client Publish</title>
  <script src="paho-mqtt.js"></script>
  <script src="util.js"></script>
</head>
<h2>MQTT JavaScript Client Publish</h2>
<p>Click F12 to check messages in console log.<p>
</html>
<script>
// Create a client instance
var client = new Paho.Client(mqtt.hostname, Number(mqtt.port), "pub-client-id");
// set callback handlers
client.onConnectionLost = onConnectionLost;
// connect the client
console.log("attempting to connect...")
client.connect({onSuccess:onConnect, useSSL: false});
// called when the client connects
function onConnect() {
  // Once a connection has been made, make a subscription and send a message.
  console.log("onConnect");
  repeatPublish();
}
function repeatPublish() {
    publish_cnt++;
    console.log("Sending message: "+publish_cnt);
    client.publish(topic_name, "Hello from a publish call : " + publish_cnt, 1, false)
    setTimeout(repeatPublish, 10000); // milliseconds
}
</script>
MQTT Testing
The example leaves messages displayed in console log. Using F12 Inspect to open Chrome console log help you to check data transmission.

Application 1: JavaScript MQTT for Browser Control Panel
Usually, users would like to check status or issue commands on control panel to administrate devices. However, if control panels are implemented on browsers, it is difficult to automatically refresh screen for real-time device status.
Of course, you can periodically make a query to get new status from servers, like the example mentioned in the article Trigger Remote Shell Script on Linux via Http Browser.
Alternatively, setting a control panel as a MQTT subscriber technically will notify browsers to ask HTTP servers for new device status. By this method, browsers make requests only when status change. Specially, MQTT messages should be more lightweight than HTTP messages.
Application 2: JavaScript MQTT on Cordova Hybrid APPs
For hybrid APPs, Cordova can create MQTT-relevant APPs on both Android and iOS using only one set of source codes. Compared with native APPs, almost half programming efforts are saved.
You can put this example into a Cordova project to create a hybrid APP. For example, we have a post about an APP of How MQTT Plus Cordova GPS APP Track My Family.
If not familiar with the procedure by steps, refer to our previous post about Cordova building process.
FINAL
Conclusion
Thank you for reading, and we have suggested more helpful articles here. If you want to share anything, please feel free to comment below. Good luck and happy coding!
Learning Tips
Let us suggest a excellent way to learn HTML scripts here. Using Google Chrome F12 Inspect or Inspect Element will help you study the codes.
In Google Chrome, there are two ways to inspect a web page using the browser built-in Chrome DevTools:
- Right-click an element on the page or in a blank area, then select Inspect.
- Go to the Chrome menu, then select More Tools > Developer Tools.