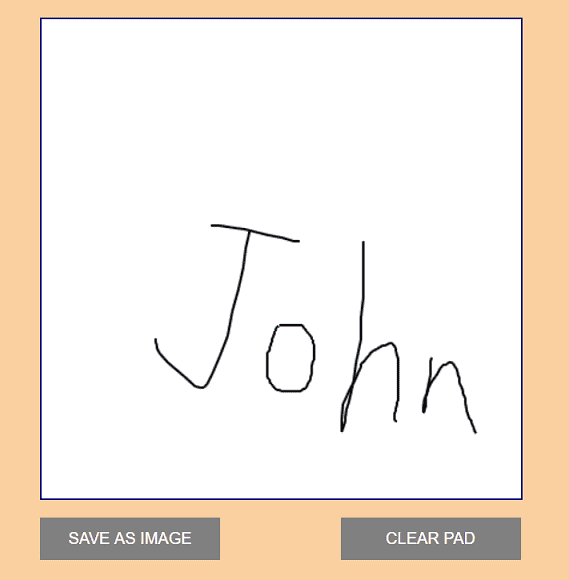
You can sign a signature on HTML5 Canvas by moving mouses. Listening to 3 mouse events, we discover a straight-forward and event-driven approach to do it. Furthermore, you can save your signature as an image file.
All codes here are not complicated, so you can easily understand even though you are still students in school. To benefit your learning, we will provide you download link to a zip file thus you can get all source codes for future usage.
Estimated reading time: 6 minutes
EXPLORE THIS ARTICLE
TABLE OF CONTENTS
BONUS
Source Code Download
We have released it under the MIT license, so feel free to use it in your own project or your school homework.
Download Guideline
- Prepare HTTP server such as XAMPP or WAMP in your windows environment.
- Download and unzip into a folder that http server can access.
SECTION 1
The Basics
In the beginning, you will learn what HTML5 Canvas is and the difference between pixel-based and vector-based graphics. After that, let us simulate physical pen tablets with a mouse moving example, so as to sign a signature on canvas.
CANVAS vs. SVG
HTML5 Canvas is popular, and supports most browsers like Chrome, Firefox, Edge, and Safari. Graphically, it helps you paint what idea you will express to form a picture, and you can save it as well.
HTML5 Canvas treat drawings as pixels, instead of vectors, thus it is not easy to modify the result. If you want to realize more about vector-based graphics, please refer to Scalable Vector Graphics (SVG).
Signatures on Canvas Pad
It is convenient to sign your signature on physical Pen Tablets or Pads if you have. Otherwise, HTML5 Canvas can help you to sign a signature on screens by moving mouses.

Simply, the script handwriting.html sets <canvas> in HTML, and controls it in Javascript. We have more basic description about canvas in the article for HTML5 Canvas Line Chart.
Moreover, to download the signature from canvas, extra elements <img> and <a> should be defined in handwriting.html for necessary operations in Javascript. We will show it in Section 3.
<!DOCTYPE html>
<html>
<head>
    <title>Using 3 Events to Sign a Signature on HTML5 Canvas</title>
    <meta charset="UTF-8">
    <meta name="description" content="Scripts for Learning Programming">
    <meta name="author" content="Easy Code Share">
    <script src="https://ajax.googleapis.com/ajax/libs/jquery/3.4.0/jquery.min.js"></script>
    <script src="handwriting.js"></script>
    <link rel="stylesheet" href="handwriting.css">
</head>
<body>
    <div>
        <canvas id="mycanvas" width="400px" height="400px"></canvas>
        <input id="download" type="submit" value="SAVE AS IMAGE"/>
        <input id="clear" type="submit" value="CLEAR PAD"/>
    </div>
    <img id="hdwrite-image"></img>
    <a id="link"></a>
</body>
</html>
<script>
$(document).ready(function() {
    hdwrite.addEvent();
    $('input#download').on("click", function() {
        hdwrite.download();
    });
    $('input#clear').on("click", function() {
        hdwrite.clear();
    });
});
var canvas = document.getElementById('mycanvas');
var ctx = canvas.getContext("2d");
</script>
The handwriting.css briefly deploys the layout. In addition, we set cursor:crosshair for canvas:hover, thus when mouses moving into canvas from outside, the cursor changes its shape to express that you can drawing now.
body {background:#FAD0A0; font-family:Arial; font-size:1.2em; }
div {margin:30px; float:left; width:500px; height:500px;}
canvas {border:1px solid navy; background:#fff;}
canvas:hover {cursor:crosshair;}
input {margin-top:10px; width:150px; padding:10px; background:gray; border:0; outline:none; color:#fff }
input:hover {background:navy;}
input#clear {margin-left:95px;}
img {display:none;}
SECTION 2
Handling 3 Events
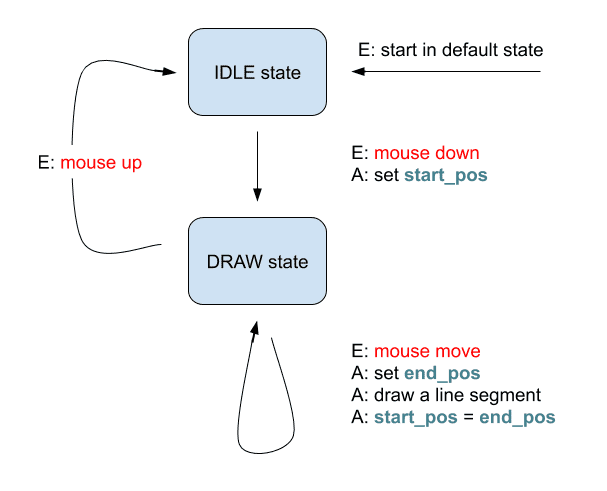
From the view of state transition, we are presenting our core algorithm of listening and handling mouse events to get signatures on HTML5 Canvas. Unlike complex algorithms, it gets efficient.
Listen to Mouse Events
In general, an event-driven model fits how signatures are created to our canvas solution. For example, the event E: mouse down make a state transition from IDLE state to DRAW state. Along with state transition, the action A: set start_pos sets starting position of a line segment to be sketched.

The following script corresponds to this state transition diagram. Accordingly, there are 3 canvas methods addEventListener() listening to events of E: mouse down, E: mouse move, and E: mouse up. Once users operate on mouses, events will trigger both changing state and performing actions if there exists.
/* Hand Writing Scripts */
var hdwrite = {
    .....
    on_drawing: false,
    addEvent: function() {
        canvas.addEventListener("mousedown",function(evt){
            this.on_drawing = true;
            pos_start = hdwrite.getMousePos(this, evt);
        });
        canvas.addEventListener("mouseup",function(evt){
            this.on_drawing = false;
        });
        canvas.addEventListener("mousemove",function(evt){
            if (this.on_drawing) {
                var pos = hdwrite.getMousePos(this, evt);
                hdwrite.line(pos_start, pos);
                pos_start = pos;
            }
        });
    },
    .....
};
Often, a signature curve consists of many connected line segments on HTML5 Canvas. As in the program, when a mousemove event occurs and current state is on_drawing, the procedure will be locating an end point, drawing a line segment, and setting a new start point. Iteratedly, mousemove events generate a lot of connected line segments which constitute a hand-writing curve.
Once a mouseup event happens in DRAW state, the state becomes IDLE. At this time, any mousemove event won’t contribute to the signature on canvas.
Get Mouse Positions & Draw Line Segments
Knowing how to locate mouse cursor is a little bit complex. In short, both the canvas method getBoundingClientRect() and the callback function of canvas method addEventListener() provide two pairs of X-Y coordinates, rect and evt. The distances of them are what you want.
/* Hand Writing Scripts */
var hdwrite = {
    .....
    line: function(start, end, strokeStyle='black', lineWidth=2) {
        ctx.lineWidth = lineWidth;
        ctx.strokeStyle = strokeStyle;
        ctx.beginPath();
        ctx.moveTo(start.x, start.y);
        ctx.lineTo(end.x, end.y);
        ctx.stroke();
        ctx.closePath();
    },
    getMousePos: function(cs, evt) {
        var rect = cs.getBoundingClientRect();
        return {
          x: evt.clientX - rect.left,
          y: evt.clientY - rect.top
        };
    },
    .....
};
SECTION 3
Save Canvas Signature
Like a real tablet, we design buttons to erase or save a signature on canvas. In addition, the procedure to save an image uses some HTML elements as temporary storage.
Clear Canvas Signature
In Section 1, there is a declaration ctx = canvas.getContext("2d") in HTML file. It supports most operations on canvas such as clearing content and drawing line segments.
/* Hand Writing Scripts */
var hdwrite = {
    .....
    clear: function() {
        ctx.clearRect(0, 0, canvas.width, canvas.height);
    },
};
Save Canvas Signature
<img id="hdwrite-image"></img>
<a id="link"></a>
Remind you that there are two HTML elements <img> and <a> in Section 1 which help you to save signatures. Using them as temporary storage, the Javascript method hdwrite.download() can download the signature on HTML5 canvas to be an image file of PNG or JPG type.
/* Hand Writing Scripts */
var hdwrite = {
    download: function() {
        var myImage = canvas.toDataURL("image/png");
        var img = document.getElementById('hdwrite-image');
        img.src = myImage;
        var link = document.getElementById('link');
        link.setAttribute('download', 'hdwrite.png');
        link.setAttribute('href', myImage.replace("image/png", "image/octet-stream"));
        link.click();
    },
    .....
};
FINAL
Conclusion
Luckily, you get brief codes for building a HTML5 Canvas pad, which allow you to sign a signature and save it. Thank you for reading, and we have suggested more helpful articles here. If you want to share anything, please feel free to comment below. Good luck and happy coding!
Learning Tips
Let’s suggest a excellent way to learn HTML scripts here. Using Google Chrome F12 Inspect or Inspect Element will help you study the codes.
In Google Chrome, there are two ways to inspect a web page using the browser’s built-in Chrome DevTools:
- Right-click an element on the page or in a blank area, then select Inspect.
- Go to the Chrome menu, then select More Tools > Developer Tools.
Suggested Reading
TRY IT
Quick Experience
That’s all for this project, and here is the link that let you experience the program. Please kindly leave your comments for our enhancement.
Try It Yourself
Click here to execute the source code, thus before studying the downloaded codes, you can check whether it is worthy.

