
File Upload allow various approaches, including HTML, jQuery AJAX, and PHP. This ultimate complete guide helps you understand how to choose a proper method among them. For the case of file transfer between hosts, only PHP cURL is available. Here only single file upload is written. In next article, we will talking about multiple file upload in details.
All codes here are not complicated, so you can easily understand even though you are still students in school. To benefit your learning, we will provide you download link to a zip file thus you can get all source codes for future usage.
Estimated reading time: 9 minutes
EXPLORE THIS ARTICLE
TABLE OF CONTENTS
BONUS
Source Code Download
We have released it under the MIT license, so feel free to use it in your own project or your school homework.
Download Guideline
- Prepare HTTP server such as XAMPP or WAMP in your windows environment.
- Download and unzip into a folder that http server can access.
SECTION 1
Html File Upload
Imaging that a PHP file upload server is listening. And It will accept both file and data upload from browser clients by using HTML <form> element, in which a lot of <input> tags can hold file or data.
Method 1A – HTML FORM Upload (File)

This is the simplest one among all methods to be enumerated. Let us explain enctype="multipart/form-data" first. When you make a POST request, you have to encode the body of data in some way. Remember to use multipart/form-data when including any <input type="file"> elements.
<!DOCTYPE html>
<!-- method 1A - upload file by HTML Form -->
<html>
<head><link rel="stylesheet" href="upload.css"></head>
<body>
<form action="http://localhost/wpp/exams/a0010/server/single-upload.php" method="post" enctype="multipart/form-data">
    <input type="file" name="myfile">
    <input type="submit" value="Upload">
</form>
</body>
</html>
For INPUT tag, type="file" can open a dialog box for selecting at most one file, and type="submit" allow users to confirm the action of file upload.
Method 1B – HTML FORM Upload (File & Data)

Based on Method 1A, along with files, data can be uploaded by defining a hidden input field type="hidden", which includes data that cannot be seen. The data to be sent could be a simple string or JSON data, like this.
{method:'method 2', msg:'upload file along with data by HTML Form'}
<!DOCTYPE html>
<!-- method 1B - upload file along with data by HTML Form -->
<html>
<head><link rel="stylesheet" href="upload.css"></head>
<body>
<form action="http://localhost/wpp/exams/a0010/server/single-upload.php" method="post" enctype="multipart/form-data">
    <input type="file" name="myfile">
    <input type="hidden" name="data" value="{method:'method 2', msg:'upload file along with data by HTML Form'}">
    <input type="submit" value="Upload">
</form>
</body>
</html>
SECTION 2
jQuery Ajax File Upload
Also, jQuery AJAX $.ajax() can transfer files to a PHP file upload server from browser clients. Importantly, the key point is FormData, which carries file and data for upload by means of POST method.
Method 2A – jQuery AJAX Upload (File)

Once submitted on HTML FORM with id="form", jQuery codes $("#form").submit() prepares the file to be uploaded by creating a FormData object. The $("#form")[0] represents HTML <form> element.
<!DOCTYPE html>
<!-- method 2A - upload file by jQuery -->
<html>
<head>
<script src="https://ajax.googleapis.com/ajax/libs/jquery/3.4.1/jquery.min.js"></script>
<link rel="stylesheet" href="upload.css">
</head>
<body>
<form id="form">
    <input type="file" name="myfile">
    <input type="submit" value="Upload">
</form>
</body>
</html>
<script>
$(document).ready(function() {
    $("#form").submit(function(e){
        e.preventDefault();
        var formData = new FormData($("#form")[0]);
        $.ajax({
            url : "http://localhost/wpp/exams/a0010/server/single-upload.php",
            type : "post",
            data : formData,
            contentType : false,
            processData : false,
            success: function(resp) {
                console.log(resp);
                alert(resp);
            }
        });
    });
});
</script>
After that, the AJAX call, $.ajax(), uploads a single file within data : formData.
Method 2B – jQuery AJAX Upload (File & Data)

Extended from Method 2A, we are going to upload both file and data at a time. For the Javascript object data={...} to be uploaded, JSON.stringify(data) convert it to JSON notation, and then formData.append() append this JSON at end of formData object with the key named 'data'.
<!DOCTYPE html>
<!-- method 2B - upload file along with data by jQuery -->
<html>
<head>
<script src="https://ajax.googleapis.com/ajax/libs/jquery/3.4.1/jquery.min.js"></script>
<link rel="stylesheet" href="upload.css">
</head>
<body>
<form id="form">
    <input type="file" name="myfile">
    <input type="submit" value="Upload">
</form>
</body>
</html>
<script>
$(document).ready(function() {
    $("#form").submit(function(e){
        e.preventDefault();
        var formData = new FormData($("#form")[0]);
        data = {method: 'method 4', msg:'upload file along with data by jQuery'};
        for(key in data) {
            formData.append("data["+key+"]", data[key]);
        }
        $.ajax({
            url : "http://localhost/wpp/exams/a0010/server/single-upload.php",
            type : "post",
            data : formData,
            contentType : false,
            processData : false,
            success: function(resp) {
                console.log(resp);
                alert(resp);
            }
        });
    });
});
</script>
In other words, FormData object contain both file and data. Similarly, $.ajax(), uploads the combination, data : formData, finally.
SECTION 3
Php File Upload
Unlike previous 4 methods that allow file upload from browsers to hosts, the next 2 PHP methods implement file transfer between hosts. Moreover, we will show different writings in various PHP versions, and write about using a complex JSON, instead of a simple string, as data to be uploaded.
Method 3A – PHP Upload (File)

cURL is a PHP library that helps you send files and also data over HTTP or FTP. That is, PHP cURL can execute file upload between hosts without help of browsers. Issue a command line like this.
eric@hr5:~/a0010$ php upload-3A.php
filename : in_transit.png
Basically, PHP cURL applies curl_init(), curl_setopt(), and curl_exec() functions to upload POST data, of course, including files. The configuration about CURLOPT_POSTFIELDS contains POST data to be sent, and the key 'myfile' in array will lead to a notation of $_FILES['myfile'] at destination site.
<?php
    /* method 3A - upload file by pure PHP */
    $url = "http://localhost/wpp/exams/a0010/server/single-upload.php";
    $path = "images/in_transit.png";
    $req = curl_init($url);
    curl_setopt($req, CURLOPT_HEADER, false);
    curl_setopt($req, CURLOPT_POST, true);
    if (function_exists('curl_file_create')) { // php 5.5+
        $cFile = curl_file_create($path);
    } else { //
        echo 'PHP ' . phpversion() . PHP_EOL;
        $cFile = '@' . realpath($path);
    }
    curl_setopt($req, CURLOPT_POSTFIELDS, array('myfile' => $cFile));
    curl_setopt($req, CURLOPT_RETURNTRANSFER, true);
    curl_setopt($req, CURLOPT_TIMEOUT, 10);
    $data = curl_exec($req);
    echo $data;
?>
The $cFile is a CURLFile object. However, PHP creates it in alternative ways according to PHP versions, because curl_file_create() only exists in versions of php 5.5 above.
Method 3B – PHP Upload (File & Data)

In addition, we can upload data together with file. For example, let us compare the way to upload simple data with the way to upload data array.
The notation is a little bit special, isn’t it? Anyway, this example below teach you how to upload file and data array between hosts by using PHP cURL.
<?php
    /* method 3B - upload file along with data by pure PHP */
    $url = "http://localhost/wpp/exams/a0010/server/single-upload.php";
    $path = "images/in_transit.png";
    $req = curl_init($url);
    curl_setopt($req, CURLOPT_HEADER, false);
    curl_setopt($req, CURLOPT_POST, true);
    if (function_exists('curl_file_create')) { // php 5.5+
        $cFile = curl_file_create($path);
    } else { //
        echo 'PHP ' . phpversion() . PHP_EOL;
        $cFile = '@' . realpath($path);
    }
    curl_setopt($req, CURLOPT_POSTFIELDS, array(
        'data[method]'=>'method 6',
        'data[msg]'=>'upload file along with data by pure PHP',
        'myfile'=>$cFile
        ));
    curl_setopt($req, CURLOPT_RETURNTRANSFER, true);
    curl_setopt($req, CURLOPT_TIMEOUT, 10);
    $data = curl_exec($req);
    echo $data;
?>
SECTION 4
File Upload Server
Subsequently, let us see how server sites handle file upload using PHP. No matter in Windows or Linux, a temporary area is designed to keep incoming files, but they should be moved out later. Also, PHP setting about some limits, and cURL installation are listed.
Move Uploaded Files
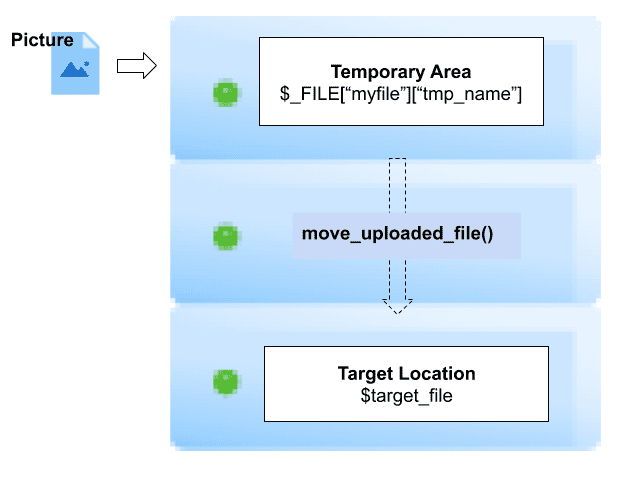
Let us see what information a PHP server site will get about file upload. The super global variable $_FILES["myfile"] is a context of that. Among its properties, only $_FILES["myfile"]["tmp_name"] will be mentioned here.
[myfile] => Array
(
    [name] => in_transit.png
    [type] => application/octet-stream
    [tmp_name] => C:\xampp\tmp\phpBD73.tmp
    [error] => 0
    [size] => 8861
)
When a file arrives, PHP puts it in temporary area. The PHP server-site scripts have to move it to destination by calling move_uploaded_file(). If exceptions occur, the error reasons will appear in /var/log/apache2/error.log for Linux.
Usually, the error would be “permission denied.” When HTTP service is not available to create new files in target directory, ~/uploads, for example. Please grant permission using command lines as below, where www-data represents Apache2 user id on Ubuntu Linux.
$ chgrp www-data ~/uploads
$ chmod g+w ~/uploads
<?php
/* upload one file */
$upload_dir = 'uploads';
$name = basename($_FILES["myfile"]["name"]);
$target_file = "$upload_dir/$name";
if ($_FILES["myfile"]["size"] > 10000) { // limit size of 10KB
    echo 'error: your file is too large.';
    exit();
}
if (!move_uploaded_file($_FILES["myfile"]["tmp_name"], $target_file))
    echo 'error: '.$_FILES["myfile"]["error"].' see /var/log/apache2/error.log for permission reason';
else {
    if (isset($_POST['data'])) print_r($_POST['data']);
    echo "\n filename : {$name}";
}
?>
In addition, $_FILES["myfile"]["size"] helps limit size of the file to be uploaded.
PHP.INI
PHP configuration file locates in c:\xampp\php\php.ini for Windows and /etc/php/5.6/apache2/php.ini for PHP 5.6 in Ubuntu Linux, respectively.
The settings in PHP configuration file php.ini for file upload primarily define temporary directory, maximum allowed file size, and maximum number of files.
;;;;;;;;;;;;;;;;
; File Uploads ;
;;;;;;;;;;;;;;;;
; Whether to allow HTTP file uploads.
; http://php.net/file-uploads
file_uploads=On
; Temporary directory for HTTP uploaded files (will use system default if not
; specified).
; http://php.net/upload-tmp-dir
upload_tmp_dir="C:\xampp\tmp"
; Maximum allowed size for uploaded files.
; http://php.net/upload-max-filesize
upload_max_filesize=2M
; Maximum number of files that can be uploaded via a single request
max_file_uploads=20
In Windows, Uncommenting the following setting in in c:\xampp\php\php.ini will enable PHP cURL.
extension=php_curl.dll
In Linux, PHP cURL can be installed using command lines for PHP 5.6.
$ sudo apt-get install php5.6-curl
And for PHP 7.1, use the following.
$ sudo apt-get install php7.1-curl
FINAL
Conclusion
In the next article, we are going to discuss with you the approach to Multiple File Upload in PHP, HTML, jQuery by 6 Ways. Thank you for reading, and we have suggested more helpful articles here. If you want to share anything, please feel free to comment below. Good luck and happy coding!
Suggested Reading
- Multiple File Upload in PHP, HTML, jQuery by 6 Ways
- 4 Practices for Python File Upload to PHP Server