You can store JSON object or JSON array into an attribute on an HTML element, just as you treat them as strings. This article teach you how to embed JSON data in HTML, and moreover, retrieve it from HTML attributes.
Along with this major topic, an extra tip about toggling to hide or show some rows in HTML Table elements can be found here, too.
All codes here are not complicated, so you can easily understand even though you are still students in school. To benefit your learning, we will provide you download link to a zip file thus you can get all source codes for future usage.
Estimated reading time: 7 minutes
EXPLORE THIS ARTICLE
TABLE OF CONTENTS
BONUS
Source Code Download
We have released it under the MIT license, so feel free to use it in your own project or your school homework.
Download Guideline
- Prepare HTTP server such as XAMPP or WAMP in your windows environment.
- Download and unzip into a folder that http server can access.
SECTION 1
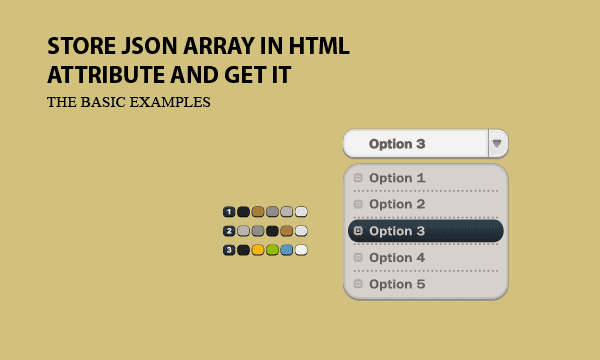
JSON in Html Attribute
In general, AJAX is used to request data on demand. But now we present an alternative approach which gets all data at loading time. Then we store JSON object or array in HTML attribute.
Embed JSON in HTML OPTION Tag
You can not only put a string into HTML attribute, for instance, <option type="members" value="option_1">, but also store a JSON object or array in HTML.
See below, the function json_encode($data) converts data into JSON array. Then we embed the JSON array into HTML attribute value, which is truely complex tabular data, instead of a simple string.
.....
<!DOCTYPE html>
<html>
<head>
    <title>How to Store JSON Array in HTML Attribute and Get It</title>
    <meta charset="UTF-8">
    <meta name="description" content="Scripts for Learning Programming">
    <meta name="author" content="Easy Code Share">
    <meta name="viewport" content="width=device-width, initial-scale=1, shrink-to-fit=no">
    <script src="https://ajax.googleapis.com/ajax/libs/jquery/3.4.0/jquery.min.js"></script>
    <script src="embed.js"></script>
    <link rel="stylesheet" href="embed.css">
</head>
<body>
    <select id="datatype">
    <?php
        foreach($datalist as $key=>$data) {
            echo "<option type='" . $key . "' value='" . json_encode($data) . "'>" . $key . "</option>";
        }
    ?>
    </select>
    <div id="display"></div>
</body>
</html>
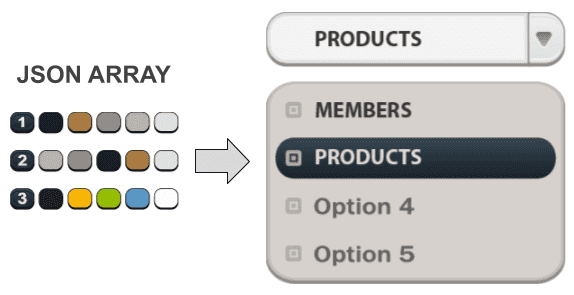
The <select> element is used to create a drop-down list, while the <option> tags inside the <select> element define the available options in the list.
Once clicking on <select> element, Javascript embed.js will read JSON data from the selected <option> tag, and display them in <div id="display"></div> element in the form of tabular data.
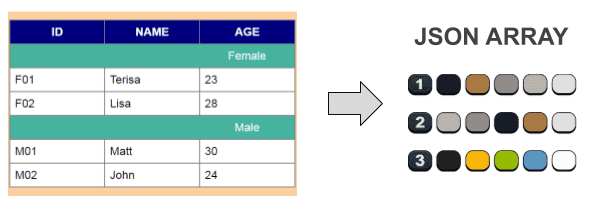
Tabular Data in JSON
<?php
$members=array(
    "Title"=>array(["ID", "NAME", "AGE"]),
    "Female"=>array(
    ["F01", "Terisa", 23],
    ["F02", "Lisa", 28]),
    "Male"=>array(
    ["M01", "Matt", 30],
    ["M02", "John", 24])
);
$products=array(
    "Title"=>array(["PRODUCT", "COLOR", "PRICE", "STOCK"]),
    "Electronic"=>array(
    ["iPad", "black", 400, 5],
    ["Camera", "gray", 180, 3]),
    "Cloth"=>array(
    ["T-Shirt", "yellow", 20, 10],
    ["Coat", "navy", 35, 7])
);
$datalist=array("members"=>$members, "products"=>$products);
?>
.....
Even though these testing data $members and $products have the multiple-level structure, HTML attribute can keep them well. The two complex tabular data can be integrated into a single array $datalist.
Why we design the example by this way is to help you deeply understand that a HTML attribute contains not only a simple string, but also a complex JSON array.
CSS Layout
body {background:#FAD0A0; font-family:Arial; font-size:1.5em}
select {width:200px; font-size:1.2em; height:40px; margin:20px 0 20px 0;}
div {width:600px;}
table, table tr, table tr th, table tr td {border:2px solid gray; padding:10px;}
table {width:600px; border-collapse:collapse;}
table tr th {width:160px; background:navy; color:white;}
table tr.bar {background:#45B39D; color:white; cursor:pointer; text-align:center}
table tr.bar:hover {background:#16A085;}
table tr.bar td {border-style:solid none solid none;}
table tr td.item {width:160px; background:white;}
@media only screen and (max-width: 720px){
    div, table {width:100%}
}
CSS file embed.css configures both select for drop-down list and div for tabular data display. Inside div element, table element displays complex JSON data as designed. Considering RWD(Responsive Web Design), @media defines how mobile devices present in proper resolution.
SECTION 2
JSON From Html Attribute
Let us discuss how to display JSON data from HTML attributes. With help of Javascript, parse it first, and then insert them into Table element. As the example data is classified as levels, in Table element, we add an extra tip here about how to toggle partial rows to be hide and show.
Parse JSON into Javascript Object
The PHP scripts define two tabular data. When the select list is dropped down, $("select#datatype option:selected") will get a selected type attribute, which determines JSON members or products to be retrieved from JSON array.
After that, JSON.parse() parses and retrieves a set of JSON data from HTML attribute value. This data has multiple levels with a special structure and kinds of HTML attributes. Iteratively, you should organize it to fit the format of HTML table element for display.
var magic = {
    sel : function () {
        var type = $("select#datatype option:selected").attr("type");
        htm = "<table id='" + type + "'>";
        var data = JSON.parse($("select#datatype option:selected").attr("value"));
        for(typename in data) {
            if (typename == "Title") {
                htm += "<tr>";
                cnt = data[typename][0].length;
                for (i = 0; i < cnt; i++) {
                    htm += "<th>" + data[typename][0][i] + "</th>";
                }
                htm += "</tr>";
            } else {
                htm += "<tr class='bar' typename='" + typename + "' onclick='magic.toggle(this)'>";
                for (i = 0; i < cnt-1; i++) {
                    htm += "<td></td>";
                }
                htm += "<td>" + typename + "</td>";
                htm += "</tr>";
                for(id in data[typename]) {
                    htm += "<tr id='" + typename + "'>";
                    for (i = 0; i < data[typename][id].length; i++) {
                        htm += "<td class='item'>" + data[typename][id][i] + "</td>";
                    }
                    htm += "</tr>";
                }
            }
        }
        htm += "</table>";
        $("div#display").html(htm);
    },
.....
From Javascript scripts as above, it is difficult to figure out what the resulting HTML codes are like. Referring to a tip Chrome F12 Inspect will help you to check HTML attributes in runtime. The HTML table element will display complex JSON data of members or products.
To clarify, in the beginning, both two tabular data will be embedded in separated HTML attributes value. When option tag is selected, table element just display one of them at a time.
You may notice that the <tr class='bar' typename= ... > element contains onclick = 'magic.toggle(this)'. It is another topic, and will be discussed in next paragraph.
Toggle Rows in Table
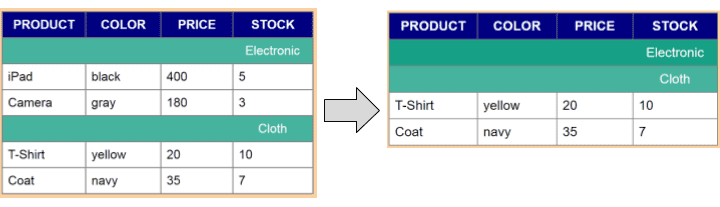
The above shows Products include groups of Electric and Cloth. On clicking the green bar, some rows disappear. If clicking again, they appear. This is toggle feature of hiding or showing some specific rows.
.....
    toggle : function (e) {
        id = $(e).attr("typename");
        ele = 'table tr#'+id;
        if ($(ele).css("display") == "none")
            $(ele).show();
        else
            $(ele).hide();
    },
};
id = $(e).attr("typename") treat a typename in green <tr> element to be an id in white <tr> element, such as <tr id="Electric">. To inspect HTML codes in runtime, please refer to learning tips Chrome F12 Inspect in next paragraph.
By this way, toggle function is done to show or hide all <tr> with a specific id.
FINAL
Conclusion
Beside the principle of JSON in HTML attributes, toggling rows to be hidden and shown is a nice tip in programming. It is worth learning how to leverage this tip in your programming.
Thank you for reading, and we have suggested more helpful articles here. If you want to share anything, please feel free to comment below. Good luck and happy coding!
Learning Tips
Let’s suggest a excellent way to learn HTML scripts here. Using Google Chrome F12 Inspect or Inspect Element will help you study the codes.
In Google Chrome, there are two ways to inspect a web page using the browser’s built-in Chrome DevTools:
- Right-click an element on the page or in a blank area, then select Inspect.
- Go to the Chrome menu, then select More Tools > Developer Tools.
Suggested Reading
- How to Rotate a Roulette Picture on Click using jQuery
- 7 Steps for HTML Bar Chart Using Javascript Canvas
TRY IT
Quick Experience
That’s all for this project, and here is the link that let you experience the program. Please kindly leave your comments for our enhancement.
Try It Yourself
Click here to execute the source code, thus before studying the downloaded codes, you can check whether it is worthy.