
There are 4 methods to auto refresh Html data in display boards such as currency rate boards, so that the web page keeps changing periodically.
The former two methods are about that browsers are polling the host site actively to get newest data. In the latter two methods, browsers just passively receive notifications of status data change.
The latter two methods are more complicated because of involving MQTT and WebSocket. Never mind, we will lead you to learn these topics from our previous posts if you are not familiar with those.
All codes here are not complicated, so you can easily understand even though you are still students in school. To benefit your learning, we will provide you download link to a zip file thus you can get all source codes for future usage.
Estimated reading time: 10 minutes
EXPLORE THIS ARTICLE
TABLE OF CONTENTS
BONUS
Source Code Download
We have released it under the MIT license, so feel free to use it in your own project or your school homework.
Download Guideline
- Prepare HTTP server such as XAMPP or WAMP in your windows environment.
- Download and unzip into a folder that http server can access.
SECTION 1
The Basics
As the stock price boards or currency boards in modern websites, any data change should update browser’s screen. Along with the 4 methods introduced, we assume that there is an engine in host site continuously changing status data. That will tend to real-world conditions.
Auto HTML Data Refresh
The diagram shows 4 methods we are going to discuss about auto html data refresh in a web page.
- HTML: meta tag will make a web page reload repeatedly per seconds.
- JS: JavaScript built-in function setInterval() periodically gets up-to-date status from host sites.
- MQTT: subscribe/publish mechanism around a specific topic name will allow web pages to passively receive status change.
- WebSocket: based on client/server structure, stable TCP/IP socket connections help the server site actively propagate status change to clients.
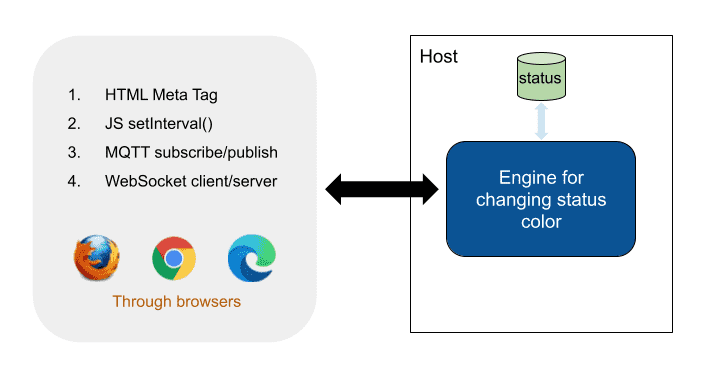
Assumptions
Suppose the server site has an engine keeping changing a status color randomly. Truly, the assumption simulates physical devices that would change their conditions according to variations in system environment.
The database is supposed to stores device status that browser’s web pages want to display. So changing status colors will make html data auto refresh. In the following sections, we will discuss these methods one by one.
SECTION 2
HTML Meta Tag
Html meta tag is the simplest method. The drawback is that reloading the whole web page will reduce system performance.
Refresh Web Pages
The meta tag in html defines that a web page can auto refresh per seconds, for example, 10 seconds. The behavior is just like pressing F5 manually.
< meta http-equiv="refresh" content="10">
Each time the html page reloads, data $status is updated and influences indicator colors.
<?php
$status = file_get_contents("status.txt");
?>
<!DOCTYPE html>
<html>
<head>
<title>Auto Refresh Status - 1</title>
<meta charset="utf-8">
<meta name="viewport" content="width=device-width, initial-scale=1, shrink-to-fit=no">
<meta http-equiv="refresh" content="10">
<link rel="stylesheet" type="text/css" href="style.css"/>
<script src="https://ajax.googleapis.com/ajax/libs/jquery/3.4.0/jquery.min.js"></script>
</head>
<body style="background: Silver;">
<div class="main-content">
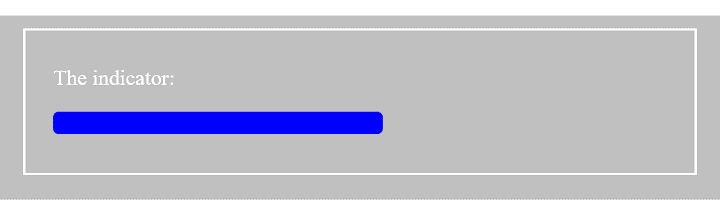
<p>The indicator:</p>
<div id="indicator"> </div>
<br>
</div>
</body>
</html>
<script>
$( document ).ready(function() {
status = "<?= $status ?>"+"\n";
$("#indicator").css("background", status);
});
</script>
SECTION 3
JS setInterval()
Here, browsers also actively ask for new data, but not reload the whole web page. This one is more efficient than the previous one due to Ajax methods in JS or jQuery.
Periodical AJAX Method
This approach leverages the feature of setting time interval in JavaScript, and also uses the Ajax method in jQuery. Like the previous section, browsers should actively make requests to get new data.
setInterval('polling()', 10000);
The function that makes requests for new status executes per 10,000 milliseconds or 10 seconds.
<!DOCTYPE html>
<html>
<head>
<title>Auto Refresh Status - 2</title>
<meta charset="utf-8">
<meta name="viewport" content="width=device-width, initial-scale=1, shrink-to-fit=no">
<link rel="stylesheet" type="text/css" href="style.css"/>
<script src="https://ajax.googleapis.com/ajax/libs/jquery/3.4.0/jquery.min.js"></script>
</head>
<body style="background: Silver;">

<div class="main-content">
<p>The indicator:</p>
<div id="indicator"> </div>
<br>
</div>

</body>
</html>
<script>
setInterval('polling()', 10000); // 10 seconds

function polling() {
    $.ajax({
        url: "indicator-2a.php",
        success: function(status) {
            $("#indicator").css("background", status);
        },
    });
}
</script>
These Ajax requests inquire changing data from an Ajax server, indicator-2a.php, in the host site. In browsers, the periodical Ajax methods cause auto refresh html data in the web page.
<?php
echo file_get_contents("status.txt");
?>
In fact, the Ajax method spends less system resources than those on meta tag refresh. Except the status color data, other elements in html does not refresh.
SECTION 4
Using MQTT
This is a creative approach by benefiting from MQTT. Unlike the previous two methods, this method allows browsers to receive up-to-date status data passively.
MQTT Auto Refresh HTML
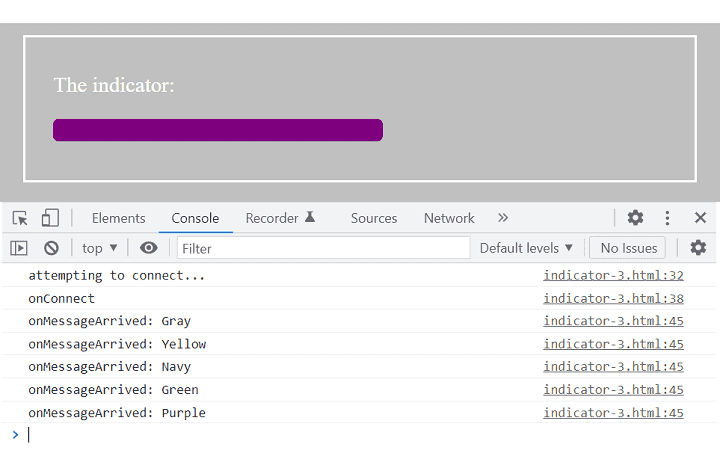
Indeed, MQTT can auto refresh html data by notifying browsers only when status in host site is changed. The notifications are not periodical actions like the previous two approaches. If you are not familiar with MQTT, we had written a post talking about MQTT basics and how to use a free MQTT broker
We implement MQTT in JS by using Paho MQTT module, paho-mqtt.js. In addition, a free MQTT broker, test.mosquitto.org, with an unencrypted port of 8080 is used.
MQTT communication needs a topic name such as ecs-status for both publishers and subscribers. Both of them should define the same topic name. In the example, the web page that auto refresh indicator colors plays the role of subscriber. On the contrary, the host site is a publisher.
<!DOCTYPE html>
<html>
<head>
<title>Auto Refresh Status - 3</title>
<meta charset="utf-8">
<meta name="viewport" content="width=device-width, initial-scale=1, shrink-to-fit=no">
<link rel="stylesheet" type="text/css" href="style.css"/>
<script src="https://ajax.googleapis.com/ajax/libs/jquery/3.4.0/jquery.min.js"></script>
<script src="paho-mqtt.js"></script>
</head>
<body style="background: Silver;">

<div class="main-content">
<p>The indicator:</p>
<div id="indicator"> </div>
<br>
</div>

</body>
</html>
<script>
var mqtt = { hostname: "test.mosquitto.org", port: 8080 };
var topic_name = "ecs-status";

// Create a client instance
var client = new Paho.Client(mqtt.hostname, Number(mqtt.port), "sub-client-id");

// set callback handlers
client.onMessageArrived = onMessageArrived;

// connect the client
console.log("attempting to connect...")
client.connect({onSuccess:onConnect, useSSL: false});

// called when the client connects
function onConnect() {
  // Once a connection has been made, make a subscription and send a message.
  console.log("onConnect");
  client.subscribe(topic_name);
}

// called when a message arrives
function onMessageArrived(message) {
  status = message.payloadString;
  console.log("onMessageArrived: "+status);
  $("#indicator").css("background", status);
}
</script>
To press F12 Inspect in browsers, you can check console logs that shows activities of colors change on the indicator just after MQTT connection is successful.
SECTION 5
Using WebSocket
Like MQTT approach, this one is also relevant to TCP/IP socket connections. For browsers supporting WebSocket, the web page can establish a stable connection to host sites in order to passively receive new status and auto refresh html data.
WebSocket Server Push New Status to HTML
A WebSocket server can hold a connection with which clients and server exchange data. By the way, the server site can push new status color to clients. The push notification happens only when status changes, so as to reduce traffic.
If you are not familiar with WebSocket, read the article about the WebSocket basics in advance.
<!DOCTYPE html>
<html>
<head>
<title>Auto Refresh Status - 4</title>
<meta charset="utf-8">
<meta name="viewport" content="width=device-width, initial-scale=1, shrink-to-fit=no">
<link rel="stylesheet" type="text/css" href="style.css"/>
<script src="https://ajax.googleapis.com/ajax/libs/jquery/3.4.0/jquery.min.js"></script>
</head>
<body style="background: Silver;">

<div class="main-content">
<p>The indicator:</p>
<div id="indicator"> </div>
<br>
</div>

</body>
</html>
<script>
var host = 'ws://localhost:8080';
var socket = new WebSocket(host);
socket.onopen = function(evt) { console.log(evt); };
socket.onclose = function(evt) { console.log(evt); };
socket.onerror = function(evt) { console.log(evt); };
socket.onmessage = function(evt) {
    console.log(evt.data);
    $("#indicator").css("background", evt.data);
};
</script>
Most modern browsers support WebSocket. We use WebSocket with ws:// and port 8080 to connect to the host. From browser’s F12 Inspect, you can check console logs for the connection information.

The browser client sites passively receive new status color pushed from the server so that the web pages auto refresh html data. As above, the indicator color change from Gray, Black, …, to Purple.
SECTION 6
Status Change Engine
So far, we have introduced the browser part of all 4 approaches. Subsequently, the host part will be discussed.
Simulating a Device
This engine simulates devices that would change status at certain time in the real world. It is done in the function refresh_color(). But why do we design a two-thread structure? Because we need a WebSocket server for one of the 4 approaches. The function websocket_routine() handles WebSocket activities by a Python parallel task that you can learn from our previous post.

The following Python codes consist of two parts:
- Connect as a MQTT publisher with port 1883 (unencrypted).
- Create two task threads for status color changing and WebSocket service, respectively.
The thread for refresh_color() randomly generates new colors, and publish it in MQTT mechanism only when status change. The newest color is always stored in status.txt that is shared for all 4 approaches of auto html refresh.
'''
Keep changing status for the indicator in HTML pages
'''
import random
import paho.mqtt.client as mqtt
import asyncio
import websockets

status = pre_status = ""

''' List of colors for indicators '''
colors = ["Gray", "Black", "Red", "Maroon", "Yellow", "Olive", "Lime", "Green", "Aqua", "Teal", "Blue", "Navy", "Fuchsia", "Purple"]

''' Callback functions for MQTT '''
def on_connect(client, userdata, flags, rc):
    print("MQTT on_connect: " + mqtt.connack_string(rc))

def on_disconnect(client, userdata, rc):
    if rc != 0:
        print("MQTT Unexpected disconnection: {}".format(rc) )

def on_message(client, userdata, msg):
    print("MQTT onMessageArrived: " + msg.topic + " " + str(msg.payload))

def on_subscribe(client, userdata, mid, granted_qos):
    print("MQTT Subscribed: mid=" + str(mid) + " QoS=" + str(granted_qos))

def on_publish(client, userdata, mid):
    print("MQTT Published: mid=" + str(mid) )

''' WebSocket server asynchronous routines '''
async def send_status(websocket):
    global status, pre_status
    while True:
        if status != pre_status :
            await websocket.send(status)
        await asyncio.sleep(8)

async def websocket_routine() :
    async with websockets.serve(send_status, "localhost", 8080) :
        await asyncio.Future()  # run forever

''' Refresh color asynchronous routine '''
async def refresh_color() :
    global status, pre_status
    while True :
        status = random.choice(colors)
        with open('status.txt', 'w') as f: f.write(status)
        print(f"Indicator color : {status}")

        if status != pre_status :
            client.publish("ecs-status", status)  # MQTT
            print(f"MQTT Publish : {status}")

        await asyncio.sleep(8)
        pre_status = status

''' Start update '''

''' MQTT connect (The IoT solution) '''
client = mqtt.Client("pub-client-id")
client.on_connect = on_connect
client.on_message = on_message
client.on_publish = on_publish
client.on_disconnect = on_disconnect

client.connect("test.mosquitto.org", 1883, 60)
client.loop_start()

''' Concurrent tasks for WebSocket server and refreshing color '''
async def main():
    task1 = asyncio.create_task(websocket_routine())
    task2 = asyncio.create_task(refresh_color())
    await task1
    await task2

asyncio.run(main())
The thread for websocket_routine() registers a handler send_status() that pushes only changed color to browser clients for auto refresh in web page.
c:\>python changing.py

Indicator color : Olive

MQTT Publish : Olive

MQTT Published: mid=1

MQTT on_connect: Connection Accepted.

Indicator color : Red

MQTT Publish : Red

MQTT Published: mid=2

WebSocket Pushed : Red

Indicator color : Navy

MQTT Publish : Navy

MQTT Published: mid=3

WebSocket Pushed : Navy

Indicator color : Maroon

MQTT Publish : Maroon

MQTT Published: mid=4
Let us walk through the events when the engine is running. First, the event Indicator color : Oliver indicates status color Oliver that will cause both the approaches of Meta Tag and JS setInterval() to auto refresh html data in web page. At the same time, MQTT publish color Oliver just when MQTT connection is accepted.
The second random color is Red, and the third one is Navy. At this time, a WebSocket client in browser connects to the engine. Immediately, the engine pushes status color Navy so as to make browser’s html data auto refresh.
FINAL
Conclusion
We try to figure out solutions in browser clients that passively receive up-to-date data in host sites. Using MQTT or WebSocket, We did auto refresh html data in the web page just like stock price boards.
Thank you for reading, and we have suggested more helpful articles here. If you want to share anything, please feel free to comment below. Good luck and happy coding!
Thanks again.
Thanks!
Hope that help you.