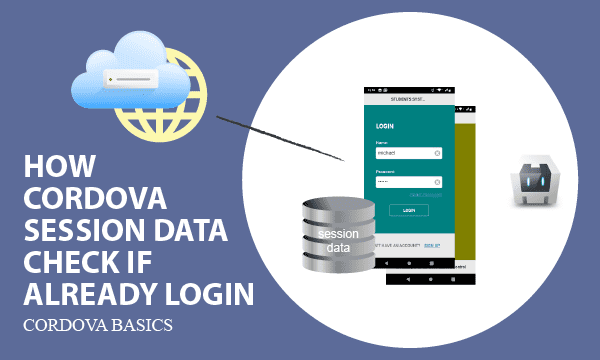
Cordova APPs perform AJAX login to get session data. If session exists, APPs always start on home page; otherwise, jump to login page. Where do session data store? How is page redirection working with help of a database class using Cordova WebSQL? Finally, we provide the procedure to build an APP in brief.
All codes here are not complicated, so you can easily understand even though you are still students in school. To benefit your learning, we will provide you download link to a zip file thus you can get all source codes for future usage.
Estimated reading time: 9 minutes
EXPLORE THIS ARTICLE
TABLE OF CONTENTS
BONUS
Source Code Download
We have released it under the MIT license, so feel free to use it in your own project or your school homework.
Download Guideline
- Prepare HTTP server such as XAMPP or WAMP in your windows environment.
- Download and unzip into a folder that http server can access.
SECTION 1
Check Login Session
First, check if already login. Unlike PHP, which has global variable $_SESSION, Cordova APP should read session data from local storage such as WebSQL. The checking result move users to correct screen layout.
Read Session Data from Cordova WebSQL
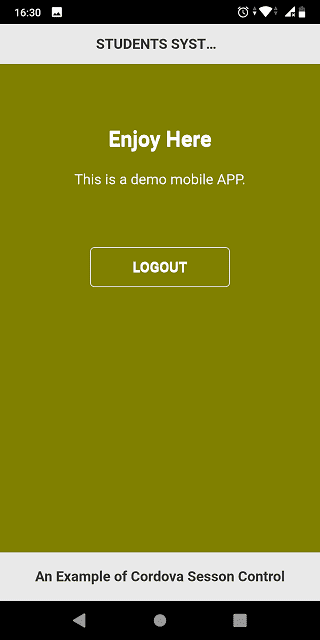
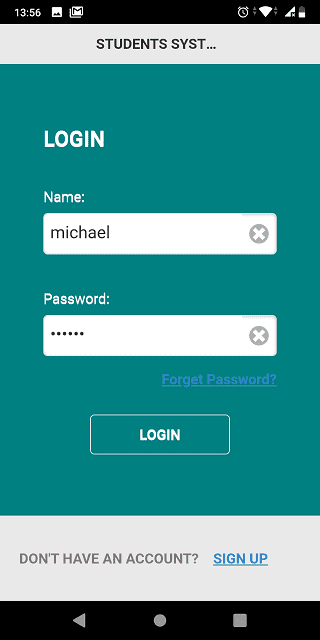
On home page, such as index.html, Cordova hybrid APPs check if local storage has session data inside. If not, jump to login page. Below is home page.
Initially, home page checks session data by connecting to and operating on Cordova WebSQL database. The callback functions Init() and checkData() are sequentially called to reflect query result, and determine whether going to login page or not.
var db;
$( document ).ready(function() {
    db = new dbClass("school", "my school", Init);
});
.....
function Init() {
    sql="CREATE TABLE IF NOT EXISTS session (userid, login)";
    db.execute(sql);
    sql="SELECT * FROM session";
    db.execute(sql, [], checkData);
}
var data = {};
.....
function checkData(rows, n, rowsAffected) {
    if(n == 0) { /* no session data */
        window.location.href = "login.html";
    }
    data = {
        userid: rows[0].userid,
        login: rows[0].login,
    };
}
Also, home page keeps user data data, which should be sent to server sites when users click LOGOUT button.
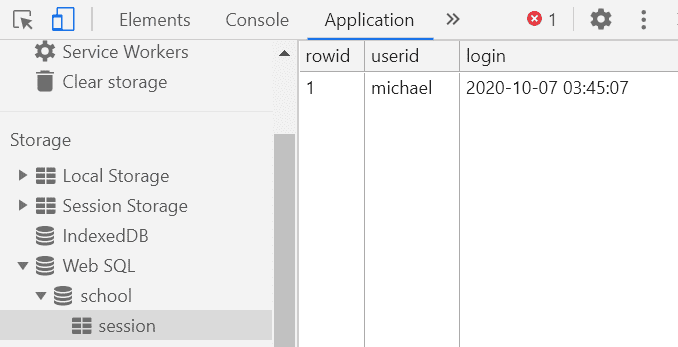
On developing or debug mode, you will find session data in browser as below. Once tested and going to production, Cordova build an APP for launch from already tested HTML and JavaScript codes.
Go to Login Form If No Session Data
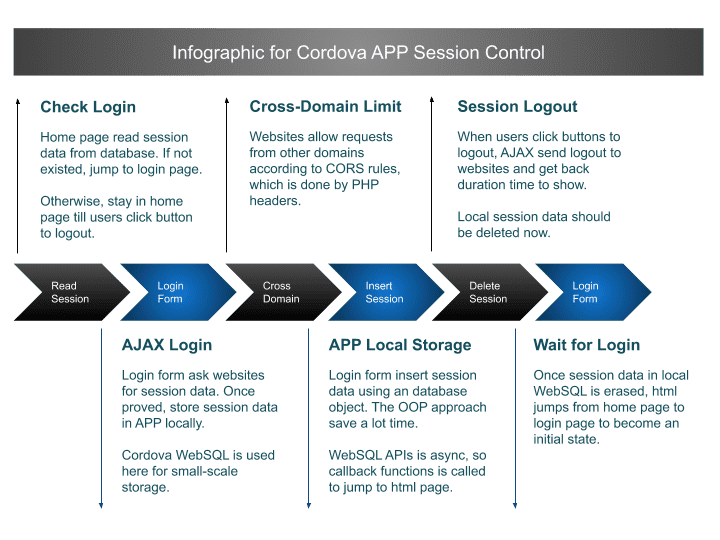
Basically, the diagram could explain the fact of login system module. The red arrow indicate creation, erasing or transmission of session data.
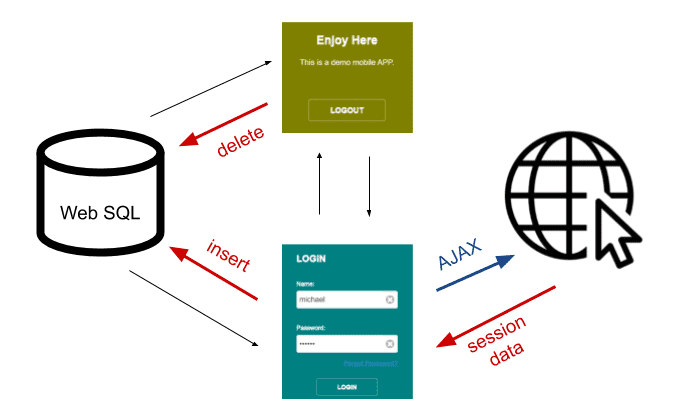
Login form asks websites for session data by using AJAX, and should keep replied data in local storage.
Suppose that a user login successfully and, for any reason, quit the APP. Next time he comes back to APP, because there are session data, he would stay in home page, rather than in login form.
SECTION 2
Cordova AJAX Login
When moved to login form, users login to websites using AJAX. However, HTTP access may get cross-domain problem that websites must overcome by setting headers. After the server replies with session data, Cordova WebSQL dbclass.js efficiently play a role for storage and even flow control.
Cross-Domain HTTP Access
Truly, Cordova embeds a domain in Android APPs to perform HTML and JavaScript codes as the www folder in Cordova project reflects the fact. As a result, there is an cross-domain issue called CORS to be discussed.
What is cross-origin resource sharing (CORS)? CORS Policy is a browser mechanism controlling access between websites or domains in order to prevent websites from cross-domain hacking-data attacks. It is implemented by Access-Control-Allow-Origin header which could be * for all domains or protected-website.com for a specified website.
To solve the problem, websites have to define a header to set rules for cross-domain HTTP access. More details about Cordova jQuery AJAX have been introduced previously. The following scripts demonstrate interaction between clients and servers.
var data = {};
.....
$('#login').on("click", function() {
    data = {
        userid: $('#userid').val(),
        pass: $('#pass').val(),
    };
    sendout("Login", data);
});
<?php
header("Access-Control-Allow-Origin:*");
$students = [ "michael"=>"123456", "Jane"=>"654321" ];
$data = $_POST["data"];
if($_POST["action"] == "Login") {
    $error = "";
    if ( !in_array( $data["userid"], array_keys($students)) ) {
        $error .= $data["userid"] . " NOT Signed Up\n";
    } elseif ($data["pass"] != $students[$data["userid"]] ) {
        $error .= "Password NOT Correct\n";
    }
    /* response */
    echo json_encode([
        "sts" => $error=="" ? "succ" : "fail",
        "err" => $error,
        "session" => [ 'userid' => $data["userid"], 'login' => date('Y-m-d H:i:s') ],
    ]);
}
if($_POST["action"] == "Logout") {
    $error = "";
    /* duration */
    $login=new DateTime($data['login']);
    $logout=new DateTime(date('Y-m-d H:i:s'));
    $interval = $logout->diff($login);
    $elapsed = $interval->format('%h hours %i minutes %s seconds');
    /* response */
    echo json_encode([
        "sts" => $error=="" ? "succ" : "fail",
        "err" => $error,
        "msg" => "login duration: ".$elapsed
    ]);
}
?>
Insert Session Data into Cordova WebSQL
Replied session data should be stored locally in APPs. Cordova WebSQL for small-scale sesson data storage is implemented here with Object-Oriented database approach when login is successful. The class script, dbclass.js, saves half time for CRUD operations in programming.
/* A database class for WebSQL */
class dbClass {
    constructor(dbName, dbDisplay="", callback=function(){}) {
        this.conn = openDatabase(dbName, '1.0', dbDisplay, 2 * 1024 * 1024); //create or open database
        this.conn.transaction(function (tx) { callback(); });
    }
    execute(sql, arr=[], callback=function(){}) {
        console.log(sql);
        console.log(arr);
        this.conn.transaction(function (tx) {
            tx.executeSql(
                sql,
                arr,
                function (tx, stmt) {
                    console.log(tx);
                    console.log(stmt);
                    callback(stmt.rows, stmt.rows.length, stmt.rowsAffected);
                },
                null
            );
        });
    }
}
By just specifying SQL statement with placeholders and corresponding parameters in db.execute(), it is easy to insert a data row. Additionally, based on async features of WebSQL APIs, the callback function checkAffected() gives information for further processing, such as jumping to home page.
if (ret.session!=undefined) { // login
    sql="INSERT INTO session (userid, login) VALUES (?, ?)";
    db.execute(sql, [ret.session.userid, ret.session.login], checkAffected);
    console.log("Insert Session Data");
} else { // logout
.....
function checkAffected(rows, n, rowsAffected) {
    if(rowsAffected == 0)
        alert("No Rows Affected");
    else
        window.location.href = "index.html";
}
SECTION 3
Cordova Session Logout
Logout procedure consists of removing session data and jumping to login form. Calling a method of database object with SQL statement and callback function as parameters will remove data. When SQL statement executes perfectly, the callback function will direct to login page to become in initial state.
Delete Session Data from Cordova WebSQL
Imagine that a user enjoy in home page, but suddenly click LOGOUT button for termination. At this moment, Android APP notifies website to end session, and get session duration to display to the user.
Deleting a row in database means canceling a session. Do it by calling db.execute() with SQL statement and a callback function. The callback checkAffected() redirects to login page from home page.
Suppose that each mobile phone allow only one-user login at any time, the DELETE statement does not specify WHERE condition. That could be upgraded to fit multiple-user version as you want.
.....
} else { // logout
    sql="DELETE FROM session";
    db.execute(sql, [], checkAffected);
    console.log("Delete Session Data");
}
var data = {};
$('#logout').on("click", function() {
    sendout("Logout", data);
});
.....
function checkAffected(rows, n, rowsAffected) {
    if(rowsAffected == 0)
        alert("No Rows Affected");
    else
        window.location.href = "login.html";
}
Turn to Login Form
After deleting session data, APP turn to login form. The Login form starts up with initial checking if session data exist, and perform the procedure opposite to that home page does.
The infographic could be helpful for you to understand login session control in Cordova APP.
SECTION 4
Cordova APP Building
Let’s start from creating a Cordova project, adding Android platform, and building an APP through Cordova CLI. More concerns about settings could be found in Cordova setup and building projects.
Create Cordova Project
Building a Cordova project has been introduced by using Cordova CLI (command-line interface) in our previous post. In this example, steps should be
$ cordova create loginform com.easycodeshare.loginform LoginForm
Where PATH is loginform, ID is com.easycodeshare.loginform, and NAME is LoginForm. All of them can be found in a config file loginform/config.xml.
Put your codes into loginform/www, check if entry point loginform/www/index.html exists, and keep in mind that no PHP files are allowed, and no CDN reference are available in HTML files.
Build Cordova Android APP
For Android APPs, you have to add Android platform before building.
$ cordova platform add android
$ cordova build android
Finally, cordova indicates the long path for resulting APK file like the following. Of course, you can build a release version once debugging is done.
BUILD SUCCESSFUL in 37s
41 actionable tasks: 2 executed, 39 up-to-date
Built the following apk(s):
        c:\loginform\platforms\android\app\build\outputs\apk\debug\app-debug.apk
FINAL
Conclusion
If you are familiar with how HTML, CSS, and Javascript create a login system, Cordova can help you to build an login APP based on these skills. This demo program enumerates considerations about session control.
Thank you for reading, and we have suggested more helpful articles here. If you want to share anything, please feel free to comment below. Good luck and happy coding!
Learning Tips
Let us suggest a excellent way to learn HTML scripts here. Using Google Chrome F12 Inspect or Inspect Element will help you study the codes.
In Google Chrome, there are two ways to inspect a web page using the browser built-in Chrome DevTools:
- Right-click an element on the page or in a blank area, then select Inspect.
- Go to the Chrome menu, then select More Tools > Developer Tools.
Suggested Reading
TRY IT
Quick Experience
That is all for this project, and here is the link that let you experience the program. Please kindly leave your comments for our enhancement.
Try It Yourself
Click here to execute the source code, thus before studying the downloaded codes, you can check whether it is worthy.