
Walking through an example, you will learn how to install and configure mod_wsgi on Apache, and enable a Python wsgi app. Accordingly, the app accepts GET and POST data and replies with text, html or json data.
Unfortunately, the ways to retrieval of GET and POST parameters from mod_wsgi are different. But when you understand what the content is, it is not difficult to parse the incoming raw data.
Moreover, we provide a debugging mechanism. As you know, the data processing always gets exceptions due to variant material.
All codes here are not complicated, so you can easily understand even though you are still students in school. To benefit your learning, we will provide you download link to a zip file thus you can get all source codes for future usage.
Estimated reading time: 7 minutes
EXPLORE THIS ARTICLE
TABLE OF CONTENTS
BONUS
Source Code Download
We have released it under the MIT license, so feel free to use it in your own project or your school homework.
Download Guideline
- Install Python on Windows by clicking Python Downloads, or search a Python setup pack for Linux.
- The installation package for Windows also contains pip install, which allow you to obtain more Python libraries in the future.
SECTION 1
Apache mod_wsgi Installation
The installation is a procedural process, rather than only a step. In case of associating mod_wsgi with a specific version of Python, such as Python 3.7, you have to get source codes of mod_wsgi and compile it. Let us discuss several issues here.
Install apache2-dev
The mod_wsgi installation process needs to update Apache configuration, so you should install Apache developing packages apache2-dev.
$ sudo apt-get install apache2-dev
Install mod_wsgi by pip
For quick start, to install mod_wsgi by pip is a basic and common method.
$ pip install mod_wsgi==4.7.1
Once complete, you can find available modules in Apache. Those contains default settings and sample settings to follow up.
$ cd /etc/apache2/mods-available

eric@myhost:/etc/apache2/mods-available$ ls -l wsgi*

-rw-r--r-- 1 root root 5055 Feb 20  2020 wsgi.conf

-rw-r--r-- 1 root root   60 Feb 20  2020 wsgi.load
Install mod_wsgi by make
Sometimes, you can’t just install mod_wsgi by pip. Assume that there are Python 3.5 and Python 3.7 installed simultaneously. If you want to associate mod_wsgi with the specific version of Python, alternatively, you should install mod_wsgi by make.
Get the archive of source codes, extract it, and configure the Python environment to compile it by make. Finally, install the result libraries.
$ wget https://github.com/GrahamDumpleton/mod_wsgi/archive/4.7.1.tar.gz

$ tar xvfz 4.7.1.tar.gz

$ cd mod_wsgi-4.7.1

$ ./configure --with-python=/usr/bin/python3.7

$ make

$ make install
If you want more information, the website mod_wsgi PyPI describes more about installation.
Install libapache2-mod-wsgi-py3
After installing mod_wsgi, you need to install an Apache’s dynamic library or called shared object that actually exists in the file mod_wsgi.so.
$ sudo apt-get install libapache2-mod-wsgi-py3
Check the file mod_wsgi.so after installation. Great! the file appears.
eric@myhost:/usr/lib/apache2/modules$ ls -l mod_wsgi*

-rw-r--r-- 1 root root 980424 Apr 11 22:07 mod_wsgi.so
Now you can enable mod_wsgi and then restart Apache. By using command apachectl, you can also securely check whether all modules are installed in Apache or not.
$ sudo a2enmod wsgi


$ sudo service apache2 restart


$ sudo apachectl -M

 wsgi_module (shared)
SECTION 2
Apache Configuration for WSGI App
After installation, you should configure Apache to fit your WSGI app. We list two simplest methods so that you can quickly start your WSGI application. More complex settings could be found in the official site.
WSGI App Group Configuration
Suppose that you have a WSGI application group in a directory, set alias by the following Apache directive WSGIScriptAlias. In the directory /var/www/html/wsgi/, we have files of myapp.py and sample.py.
WSGIScriptAlias /wsgi/ /var/www/html/wsgi/
For the directory, it is essential to set Options +ExecCGI and SetHandler wsgi-script under Apache directive <Directory>. Note that all kinds of file extension are acceptable.
<Directory /var/www/html/wsgi/>

        Options Indexes FollowSymLinks

        AllowOverride All

        Require all granted


        Options +ExecCGI

        SetHandler wsgi-script

</Directory>
Individual WSGI App Configuration
You may configure individual WSGI application as below.
WSGIScriptAlias /myapp /var/www/html/wsgi/myapp.py

WSGIScriptAlias /sample /var/www/html/wsgi/sample.py
Restart Apache when all settings are done.
$ sudo service apache2 restart
For further study, you can read more information about configuration in mod_wsgi 4.7.1 documentation.
SECTION 3
Primary WSGI Application Issues
As a wsgi application in websites, the capability of receiving GET and POST data and sending back result data is a must. We demonstrate the handling process and, moreover, provide a debugging mechanism that gives developers a easy way to get normal and exceptional information on developing mode and even on production mode.
Application Basics
The standard wsgi application is like sample.py. The response output should be of byte type. Of course, Content-type could be application/json or text/html as you want. According to the configuration and environment in the previous section, you can make a test on the url http://www.example.com/wsgi/sample.py, and get returned “Hello World!”.
def application(environ, start_response):
    status = '200 OK'
    output = b'Hello World!'

    response_headers = [('Content-type', 'text/plain'),
                        ('Content-Length', str(len(output)))]
    start_response(status, response_headers)

    return [output]
However, the standard wsgi application is not real, because there are practical issues to be considered. Our example modify application() to be the following. That controls data from either GET or POST protocol.
def application(environ, start_response):
    status = '200 OK'

    if environ['REQUEST_METHOD'] == 'GET' :
        rdict = handle_get(environ)
    elif environ['REQUEST_METHOD'] == 'POST' :
        rdict = handle_post(environ)
    else :
        rdict = { "name": "", "price": 0 }

    output = bytes(json.dumps(rdict), 'utf-8')

    response_headers = [('Content-type', 'application/json'),
                        ('Content-Length', str(len(output)))]
    start_response(status, response_headers)

    return [output]
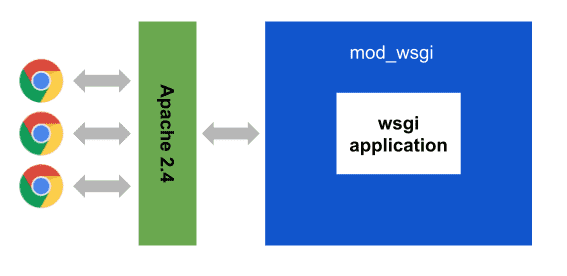
After you install and configure Apache mod_wsgi, the diagram below well depicts the relationship between Python wsgi application and other entities.
Request via HTML Form Data
Let us look at the browser client’s form data that make requests to the url http://www.example.com/wsgi/myapp.py.
<!DOCTYPE html>
<html>
<body>
<form action="http://www.example.com/wsgi/myapp.py" method="get" enctype="multipart/form-data">
    <input type="hidden" name="id" value="A001">
    <input type="submit" value="List Product A001 Info">
</form>
</body>
</html>
The first html file is for requests with GET data. It inquiries the information of product id A001. The second one is to access information of product id A002 using POST data. We allow the wsgi application myapp.py on the server site to handle both conditions.
<!DOCTYPE html>
<html>
<body>
<form action="http://www.example.com/wsgi/myapp.py" method="post" enctype="multipart/form-data">
    <input type="hidden" name="id" value="A002">
    <input type="submit" value="List Product A002 Info">
</form>
</body>
</html>
Retrieve GET Parameters
The GET data exist in environ['QUERY_STRING'], and its format is like id=A001&name=clock, for example. You can parse it yourself or leverage the cgi function parse_qs() to divide into parameters.
def handle_get(environ) :
    debugLog("QUERY_STRING: {}".format(environ['QUERY_STRING']))
    qs = parse_qs(environ['QUERY_STRING'])
    debugLog("qs: {}".format(qs))
    id = qs.get('id', [''])[0]
    return { "name": products[id]['name'], "price": products[id]['price'] }
Retrieve POST Parameters
The method to retrieve POST data is different. First, you have to get CONTENT_LENGTH. Next, read request content body from environ['wsgi.input'].
The environ['wsgi.input'] looks like the following. It has a regular format of line by line, so you can parse it accordingly.
------WebKitFormBoundaryM0IpJzS3oTbxtIoe

Content-Disposition: form-data; name="id"


A002

------WebKitFormBoundaryM0IpJzS3oTbxtIoe

Content-Disposition: form-data; name="name"


Bi-Noculars

------WebKitFormBoundaryM0IpJzS3oTbxtIoe--
The codes below parse POST data into parameters. In the example, what you search for are product name and price by using product id. Here we ignore database but use Python dict date type to simulate a table in database.
def handle_post(environ) :
    try:
        content_len = int(environ.get('CONTENT_LENGTH', 0))
    except :
        content_len = 0

    debugLog("content_len: {}".format(content_len), True)
    request_body = environ['wsgi.input'].read(content_len)
    debugLog("wsgi.input: {}".format(request_body))

    rlist = request_body.decode().split("\n")
    debugLog("no of lines: {}".format(len(rlist)), True)
    params = {}
    for i in range(0, len(rlist)-2, 4) :
        key = rlist[i+1].split("Content-Disposition: form-data; name=\"")[1].split("\"")[0]
        value = rlist[i+3].strip()
        params[key] = value

    debugLog("POST data: {}".format(params))
    id = params['id']
    return { "name": products[id]['name'], "price": products[id]['price'] }
Debugging in WSGI App
In the developing period, how to reveal programming bugs is essential. Moreover, on production, the message logs in a file could be also helpful for problem solving. Let us design a small debugging mechanism.
Conceptually, there are two flags to control whether log is printed. When on developing mode, set DEVELOP_MODE = True. When calling the debug function, set the 2nd parameter to be True or False as below.
debugLog("content_len: {}".format(content_len), True)
True: always print debug log no matter what value the DEVELOP_MODE is.
def debugLog(msg, must=False) :
    if not DEVELOP_MODE and not must : return
    dirpath = os.path.dirname(os.path.realpath(__file__))
    debugfile = "{}/log/debug.log".format(dirpath)
    with open(debugfile, 'a', encoding='utf-8') as f :
        f.write("{} {}\n".format(datetime.now().strftime("%Y-%m-%d %H:%M:%S"), msg))
While developing, each line of message log is always kept. But if turning to production mode, only the debugLog() with must set True can write log to file. In the example, the resulting log would be as below.
2021-04-13 10:26:26 content_len: 137

2021-04-13 10:26:26 wsgi.input: b'------WebKitFormBoundary8iNBS40xtXFszuZN\r\nContent-Disposition: form-data; name="id"\r\n\r\nA002\r\n------WebKitFormBoundary8iNBS40xtXFszuZN--\r\n'

2021-04-13 10:26:26 no of lines: 6

2021-04-13 10:26:26 POST data: {'id': 'A002'}

2021-04-13 10:26:29 QUERY_STRING: {'id': ['A001']}
Remember to grant file creation permission to Apache user www-data in Ubuntu by command lines. Otherwise, there will be an error occurred in Apache log /var/log/apache2/error.log.
eric@myhost:/var/log/html/wsgi$ chmod g+w log

eric@myhost:/var/log/html/wsgi$ chgrp www-data log

eric@myhost:/var/log/html/wsgi$ ls -l

drwxrwxr-x 2 eric www-data 4096 Apr 13 10:26 log/
FINAL
Conclusion
WSGI is originated from CGI. In the article, we introduce the implementation of Python WSGI using Apache mod_wsgi and relevant issues about it.
Thank you for reading, and we have suggested more helpful articles here. If you want to share anything, please feel free to comment below. Good luck and happy coding!