How Cordova app uploads a Canvas image via Ajax will be presented here. We create a signature image data by HTML DOM TouchEvent on the Canvas element. The canvas data can be sent to the server and saved.
Behind the topics, there are two essential limits that should be fixed for Cordova upload through Ajax. They are issues about CORS policy and Android 9 clear text permission that most Ajax data sending may encounter.
All codes here are not complicated, so you can easily understand even though you are still students in school. To benefit your learning, we will provide you download link to a zip file thus you can get all source codes for future usage.
Estimated reading time: 8 minutes
EXPLORE THIS ARTICLE
TABLE OF CONTENTS
BONUS
Source Code Download
We have released it under the MIT license, so feel free to use it in your own project or your school homework.
Download Guideline
- Prepare HTTP server such as XAMPP or WAMP in your windows environment.
- Download and unzip into a folder that http server can access.
SECTION 1
Canvas Ajax Upload a Handwriting
The more secure way to keep the Canvas handwriting is to save it on a server. In the first section, we guide you through an example of uploading Canvas data via POST Ajax.
Html Layout Design
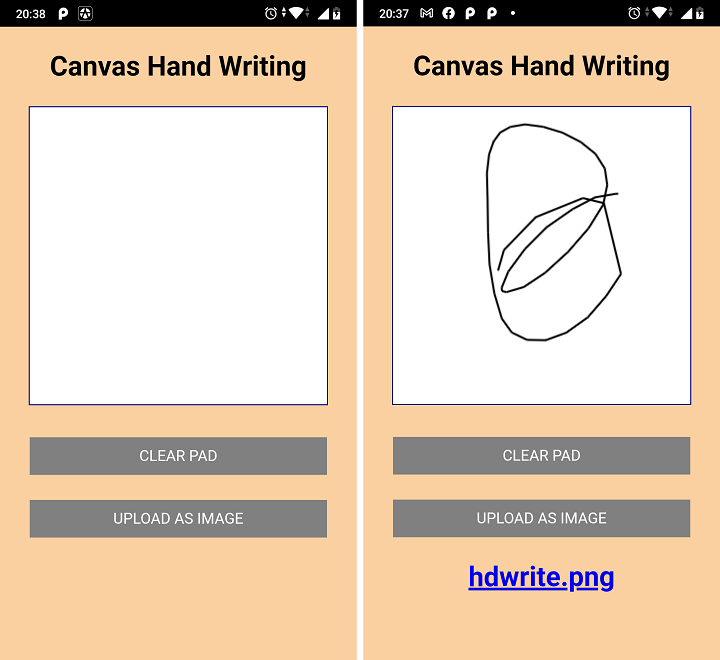
The left Html layout appears when the pad is ready for sketching, and you can draw on it. If done, the right screen indicates that the drawing is complete. Now, you can click upload button to save Canvas sketching as an image file named hdwrite.png on a server via Ajax. The blue boldface file name of hdwrite.png at the bottom is an url link for you to check whether image data have been transmitted successfully.
Look at the codes below, hdwrite is a JavaScript object, and the method hdwrite.upload() saves the caught handwriting remotely on the server.
<!DOCTYPE html>
<html>
<head>
<title>Handwriting in Canvas</title>
<meta charset="UTF-8">
<meta name="viewport" content="width=device-width, initial-scale=1, shrink-to-fit=no">
<link rel="stylesheet" href="css/handwriting.css">
<script src="js/jquery-1.11.1.min.js"></script>
<script src="cordova.js"></script>
<script src="js/index.js"></script>
</head>
<body>
    <div>
        <p>Canvas Handwriting</p>
        <canvas id="mycanvas" width="300px" height="300px"></canvas>
        <p><input id="clear" type="submit" value="CLEAR PAD"/></p>
        <p><input id="upload" type="submit" value="UPLOAD AS IMAGE"/></p>
        <p id="upload_url"></p>
    </div>
</body>
</html>
<script>
$(document).ready(function() {
    hdwrite.addEvent();
    $('input#upload').on("click", function() {
        hdwrite.upload(the_url);
    });
    $('input#clear').on("click", function() {
        hdwrite.clear();
    });
});
var canvas = document.getElementById('mycanvas');
var ctx = canvas.getContext("2d");
var the_url = "https://example.com/ajax-server.php";
</script>
Send Canvas Image via POST Ajax
Let us inspect the method hdwrite.upload(). We retrieve Canvas data as Base64 data, and send it as POST data via Ajax. The server responds with a url link from which you can check the result.
var hdwrite = {
    upload: function(url) {
        $("#upload_url").html("");
        var myImage = canvas.toDataURL("image/png");
        $.ajax({
            type: "POST",
            url: url,
            data: { imgBase64: myImage },
            success: function(r) {
                console.log(r);
                $("#upload_url").html(r);
            },
        });
    },
    // .....
};
What The Server Site Does
The following code is the url link replied to browser. When the server decodes Base64 data, and stores as an image file, it generates a url link to the image file like this. That is what the server site simply does.
<a href="https://example.com/hdwrite.png">hdwrite.png</a>
Let us see the codes in the server-site. Where $_SERVER['SCRIPT_URI'] is equal to the url "https://example.com/ajax-server.php" in JS scripts.
<?php
header("Access-Control-Allow-Origin:*");
$img = $_POST['imgBase64'];
$img = str_replace('data:image/png;base64,', '', $img);
$img = str_replace(' ', '+', $img);
file_put_contents("hdwrite.png", base64_decode($img));
$url = explode("ajax-server.php", $_SERVER['SCRIPT_URI'])[0] . "hdwrite.png";
echo "<a href='$url'>hdwrite.png</a>";
?>
SECTION 2
Limits to Cordova Upload
In the section, we start from the process of building an app which have been completely described in the previous post. Next, two limits will be discussed because mostly Ajax data transmission encounter the restrictions.
Build a Hybrid App by Cordova
Before mentioning the limits, let us look at how to create a Cordova app.
Suppose that you have been aware of the basics of Cordova and necessary environment to build an app, then you can create a new app with us step by step. Optionally, you can set an awesome icon for the app. The Cordova configuration file config.xml allows developers to define icon, splash, and even required plugin. As below, we set icons for each density in mobile devices.
<icon src="www/icons/icon72x72.png" />
<icon src="www/icons/icon36x36.png" density="ldpi" />
<icon src="www/icons/icon48x48.png" density="mdpi" />
<icon src="www/icons/icon72x72.png" density="hdpi" />
<icon src="www/icons/icon96x96.png" density="xhdpi" />
<icon src="www/icons/icon144x144.png" density="xxhdpi" />
<icon src="www/icons/icon192x192.png" density="xxxhdpi" />
![]()
Using Cordova CLI (Command Line Interface), you can create a project in the folder hdwrite, which includes sub-folder hdwrite/www and file hdwrite/config.xml.
c:\>cordova create hdwrite com.easycodeshare.hdwrite "Hand Writing"
Where com.easycodeshare.hdwrite is the identifier, and Hand Writing is a human-readable name. The cordova config.xml records both of them.
Extract the downloaded zip file to replace the content of hdwrite/www, and also replace hdwrite/config.xml with the config file in the downloaded zip file. At last, enter the command lines as below.
c:\>cd hdwrite
c:\hdwrite>cordova platform add android
c:\hdwrite>cordova build android
The result apk file could be not available, because Ajax communication is possibly blocked by two limits: CORS Policy and Android 9 Clear Text Permission. We will show you solutions here.
Limit 1 – CORS Policy in Server Site
In the downloaded zip file, you can find a PHP file hdwrite/www/ajax-server.php which does not belong to Cordova. It is a server-site script, so you should move it to the server.
<?php
header("Access-Control-Allow-Origin:*");
/* ..... */
?>
Perhaps you have noticed the cross-domain setting as above in the server-site script. The cross-domain access control must be set to allow any specific domain or all domains. Otherwise, you will get error messages in browser’s console log when you upload Canvas an image via Ajax from Cordova app.
Limit 2 – Android 9 Accept Only HTTPS by Default
Android 9 refers to HTTPS as default. That is, HTTP clear text won’t be permitted if you didn’t make any change against the default. In this example, it is assumed that you have a SSL-protected server such as this.
var the_url = "https://example.com/ajax-server.php";
If not, you need to manipulate the Android configuration in AndroidManifest.xml to allow clear text transmission. When you add Android as platform in Cordova, the config file is created in the following location.
hdwrite\platforms\android\app\src\main\AndroidManifest.xml
Gradually, you have to follow 3 steps in the article Solving Cordova Android 9 Clear Text Not Permitted to change some setting and remove obstacles.
SECTION 3
The TouchEvent Object
The TouchEvent object contains events that occur when user touches a touch-based device. In a Cordova project, we must handle the touch events in mobile panels for the purpose of capturing the user’s hand-written signature in Canvas.
TouchEvent vs MouseEvent
For your desktop and laptop computers, the MouseEvent object works well for tracking mouse positions. However, in mobile phone and tablet, we need the TouchEvent object that detect touch events in the panel.
The JavaScript object hdwrite allow you to initiate both mouse and touch events with the method of addEvent(). Thus the codes perform well for mouses and touch-based devices.
- MouseEvent :
mousedown,mouseup,mousemove - TouchEvent :
touchstart,touchend,touchmove
Now, we explain the sketching algorithm by using touch events for example. When the finger touches device panel, the event touchstart is triggered. Switch drawing mode from off to on, and keep the start position.
On drawing mode, each event touchmove produces new positions for the program to link two points to be a new tiny segment. By the way, segments form a curve line.
When the finger is up, the event touchend terminates the drawing, and drawing mode become off.
var hdwrite = {
    // .....
    addEvent: function() {
        // canvas touch events
        canvas.addEventListener("touchstart",function(evt){
            this.on_drawing = true;
            pos_start = hdwrite.getTouchPos(this, evt);
        });
        canvas.addEventListener("touchend",function(evt){
            this.on_drawing = false;
        });
        canvas.addEventListener("touchmove",function(evt){
            if (this.on_drawing) {
                var pos = hdwrite.getTouchPos(this, evt);
                hdwrite.line(pos_start, pos);
                pos_start = pos;
            }
        });
        // canvas mouse events
        canvas.addEventListener("mousedown",function(evt){
            this.on_drawing = true;
            pos_start = hdwrite.getMousePos(this, evt);
        });
        canvas.addEventListener("mouseup",function(evt){
            this.on_drawing = false;
        });
        canvas.addEventListener("mousemove",function(evt){
            if (this.on_drawing) {
                var pos = hdwrite.getMousePos(this, evt);
                hdwrite.line(pos_start, pos);
                pos_start = pos;
            }
        });
    },
    getMousePos: function(cs, evt) {
        var rect = cs.getBoundingClientRect();
        return {
          x: evt.clientX - rect.left,
          y: evt.clientY - rect.top
        };
    },
    getTouchPos: function(cs, evt) {
        var rect = cs.getBoundingClientRect();
        return {
          x: evt.changedTouches[0].clientX - rect.left,
          y: evt.changedTouches[0].clientY - rect.top
        };
    },
    // .....
};
From two functions of getMousePos() and getTouchPos() you can figure out the difference between the MouseEvent object and the TouchEvent object. The latter one always returns a list of points, even though there is only one point generated. To take a shortcut, we only use the position of the first touch event, and ignore the others.
FINAL
Conclusion
There are two new topics in this article. The first is Canvas Ajax upload of Base64 image data. The second is about TouchEvent object behaviors that achieve a Cordova hybrid app. Moreover, the Cordova building process and its Ajax limits are mentioned.
Thank you for reading, and we have suggested more helpful articles here. If you want to share anything, please feel free to comment below. Good luck and happy coding!